photoblogography - Just some stuff about photography

Using the Flextight X5 scanner

Those grapes up there, they’re sour

in Scanning , Wednesday, September 20, 2017

This is an addendum to my two previous posts comparing the Plustek OpticFilm 120 to the Hasselblad Flextight X5. The X5 is supposed to be the nirvana of desktop scanners, a dream machine with a nightmare price tag, which provides the benefits of a drum scanner with none of the downsides, such as fluid mounting, even huger cost, and elephant-level proportions.

IMG 4213

X5 workstation at Light & Byte

So, what’s the X5 actually like to use ? Well, overall, it’s pretty nice. The hardware is on a completely different level. It is easy to use and very fast in operation. It scans a 6x12 frame in under a minute. But there are some drawbacks. First of all, the film holders. They’re a little weird, to be honest. The heavy rubber masks remind me of the protective shroud things you have to wear when being X-rayed! And actually they’re not that easy to use. The problem is, you lay the film on a base plate, then lower the flexible mask, which has an aperture corresponding to the frame size. But there are no guides to align the film on the baseplate, so getting it to fit correctly in the aperture is quite fiddly. Maybe with more than two hours’ experience I might realise that there is a better way to do it, but actually I find that the Plustek holders are much easier to load accurately. And them the fixed aperture size is a bit of an issue: although in theory Medium Format film has defined sizes, different cameras have slightly different film gate dimensions. So, my Bessa 667 seems to expose slightly more area in the cross-film direction, and the Linhof 612 is more like a 612.5. Actually the Plustek holders are a bit narrow in the cross-direction too, but they are fully adjustable in length. The X5 holders have no adjustment whatsoever, although I believe Hasselblad will be delighted to sell you a custom holder. Once you’re loaded, though, it’s really smooth: just slide the holder forward between the guides until the magnets latch on, and it disappears into the scanner and does its stuff.
IMG 4214

The 612 holder latched up and ready to roll

Then, there’s the software. Really, I have yet to meet a simple, straightforward and well-designed piece of scanning software, and Flexcolor is no exception. For example, if I select the 6x12 film holder, would it be unreasonable of me to expect the scan size to default to 6x12 ? Obviously it would: it took some time for me to realise that the bloody thing was producing two scans (overlapping, fortunately).  Why it does this for 6x12, but not 24x65, or 6x7, will remain a mystery. Another unattractive thing about Flexcolor is that it only responds to adjustments after you let go of the respective control (slider or whatever). This makes it exceedingly annoying to use. And I still haven’t figured out exactly what it is that makes it show a full resolution rather than horribly pixelated low resolution preview - but then again, Silverfast still hasn’t figured out zooming. Flexcolor includes a fairly limited set of negative profiles, a bit like Silverfast Negafix. However, they are much less extensive, far less adjustable, and too my eyes less accurate than Silverfast, although they do produce very flattering results.
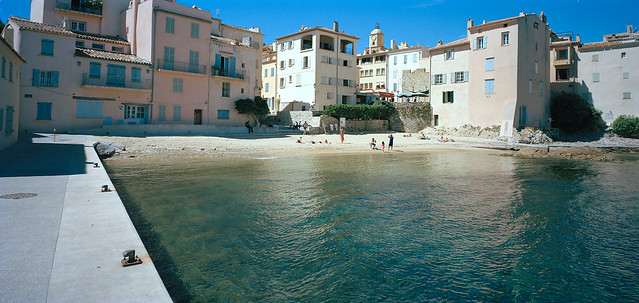
stbeach_x5

X5/Flexcolor interpretation of Kodak Provia 400

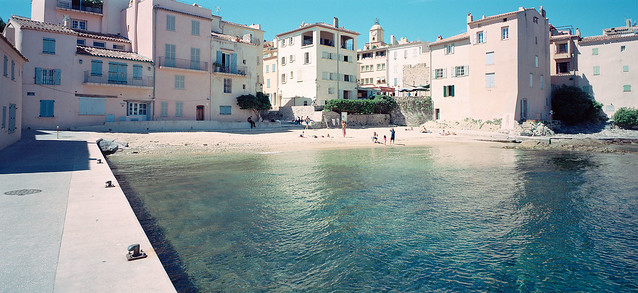
stbeach_plustek

Plustek/Silverfast interpretation of Kodak Provia 400

I don’t think either are fully accurate (actually, the Silverfast version suffers from using Multi-Exposure, which doesn’t play nice with Negafix - the marketing material doesn’t tell you that). So, I could do better “out of the box” from the Plustek. Even as it stands, to my subjective eyes the Plustek/Silverfast version looks more like how Provia is supposed to look, The X5/Flexcolor version is almost Velvia, and too neutral. Of course, Silverfast is regularly updated. Flexcolor isn’t.

On the plus side, Flexcolor coupled with the X5 can really pull out clean shadow detail to an extent I’ve never seen before from a film scanner. Of course that is limited by the exposure range of the film, so it is more useful for negatives. But still, the difference is clear.

Generally Flexcolor feels old and fairly clunky, but I suppose that is because it is old. The X1 & X5 scanners are just rebadged Imacon Precision 848 and 949 models, which Hasselblad inherited when they bought / merged with Imacon to get digital back technology. They’ve carried on selling them, but they certainly haven’t tried very hard. I reckon they could drop the price by 50% and quadruple their sales, and still make a decent profit. They’re just not interested. The only update to the hardware is case redesign and a Hasselblad logo. The backplate is still branded “Flextight Precsion”. And the backplate also features a Firewire 400 interface, the one and only port, fully obsolete. At least it isn’t SCSI. The Mac Pro running the X5 at Light & Byte is running Mac OS X Snow Leopard, which must be 8 years old or something.

So, is the X5 worth €25’000 ? No, unless you’ve got a business model which will subsidise it, or you work for a Swiss bank or something. Is the X1 worth €16’000, then ? I don’t think so - it loses the X5’s diffuse light source, it’s slower, and (if this matters to you) it can’t do batch scanning, or, indeed reflective scanning (which I really doubt is a major selling point of the X5, but whatever).  If Hasselblad were showing some sign of continuing development, even if just to add a USB3 interface, and updating Flexcolor, then just maybe it could be considered a long term investment, but I would even be concerned that it will continue to work with current operating systems for much longer.

After all, Hasselblad recently named their new pride and joy camera the “X1D”. Presumably they didn’t even remember they’ve already got an X1 in the catalogue.

Posted in Scanning on Wednesday, September 20, 2017 at 08:50 PM • PermalinkComments (1)

OpticFilm 120 vs. Flextight X5 - Round 2

the plot thickens

in Scanning , Wednesday, August 30, 2017

Last week I published the first part of my Plutek OpticFilm 120 vs Hasselblad Flextight X5 scanner bake-off. The results from scanning XPan frames were surprisingly close, with the X5 subjectively winning by a whisker.

The key word in the above paragraph is “subjectively”. Because film scanning is nothing if not subjective. While preparing this second part, I once again fell down the rabbit hole of comparing output from different scanners, different software, different settings, reproducible bugs, irreproducible bugs, and indifferent customer support.  I learned, or-relearned, a couple of key points about scanning, which can be summed up by saying that magic features - like “multi-exposure” - generally don’t work. It’s better to keep to the basics.

That out of the way, this time around I’m going to look at two Medium Format scans, a Portra 400 negative taken with the Voigtländer Bessa III 667, and a Provia 100F positive taken with the Linhox 612.

First up, the Portra shot. This was taken in a secluded spot in Venice, far from the tourist gyres.  Note, you can click on any of these images to see them in larger size on Flickr.

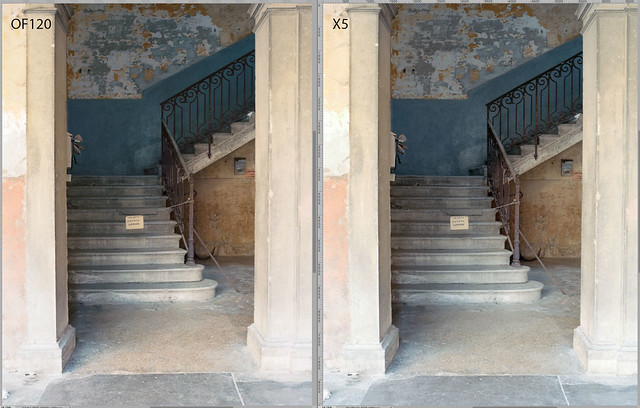
b667_1_full

Left: Plustek OpticFilm 120 (OF120), right Hasselblad Flextight X5 (X5)

In this case I decided to apply a simple grey balance using the same reference (the letter box in the background, on the right) in Silverfast HDR for the OF120, and in FlexColor for the X5. For the OF120 I used Silverfast’s Negafix Portra 400 profile, for the X5 I used FlexColor’s Portra 400NC. As you can see, they’re pretty close. Preferences are subjective. I could show you a similar frame from my Sigma DP0, and you would see that there are differences, but if I went down that path it would never end.

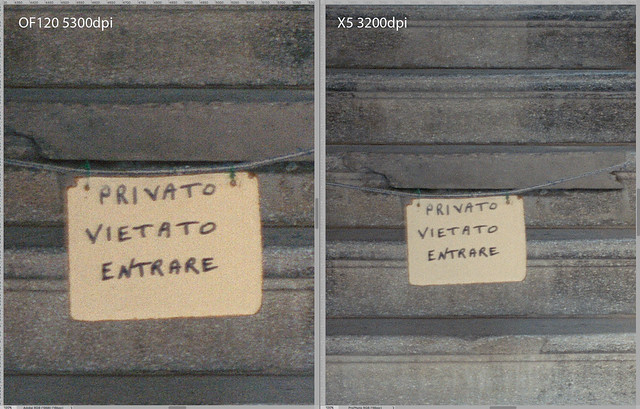
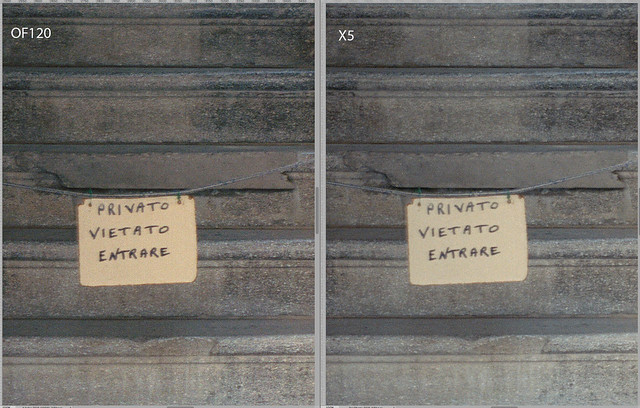
So, what about detail ? Well, I decided to zoom in on the notice in front of the staircase. Since the OF120 allows a scan a 5300dpi, and the X5 only at 3200dpi, the size at 1:1 is different.

b667_1_privato_original

1:1 zoom - left: Plustek OpticFilm 120 (OF120), right Hasselblad Flextight X5 (X5)

The extra resolution of the OF120 doesn’t really seem to add much, here. But it might be interesting to downsample to 3200dpi to get a better idea.

b667_1_privato_of_downsize

Matched resolution - left: Plustek OpticFilm 120 (OF120), right Hasselblad Flextight X5 (X5)

Well, that’s interesting, isn’t it ? As we saw in the last episode, the X5 is perhaps slightly less noisy, or possibly the diffuse light source is decreasing grain contrast, but in terms of resolution it’s pretty much a dead heat.  The OF120 scan is a little more contrasty, which may give the impression of more detail. On the other hand, it may really be delivering more detail.

So far so good, the Plustek has nothing to be ashamed about.  Let’s move on to the Provia frame. While colour negative film presents substantial challenges in colour representation, it is generally low contrast. Slide film , on the other hand, should present less problems for colour accuracy, but contrast is another matter altogether. Shadow areas can be extremely dense, and detail easily visible on a light table can be completely lost in a scan. Provia isn’t too bad in this respect, but Velvia is very tricky.  It’s just as well that I don’t much care for Velvia.

So, here’s our Provia frame:

provia_of120_x5

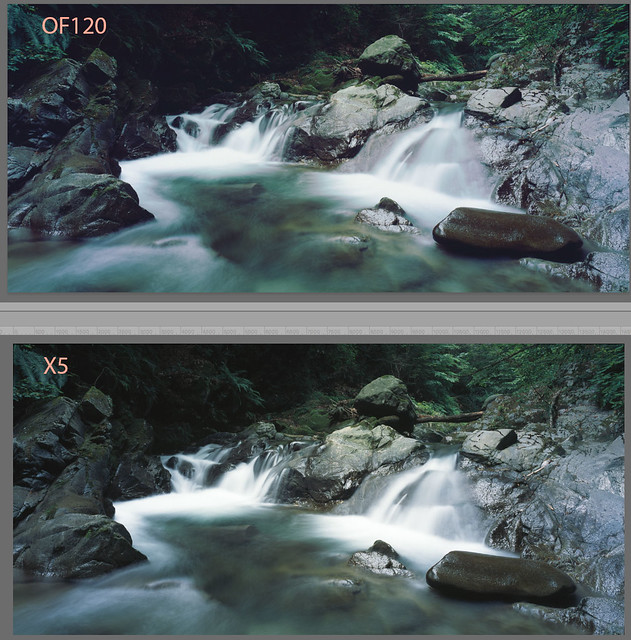
Top: Plustek OpticFilm 120 (OF120), bottom: Hasselblad Flextight X5 (X5)

You can immediately see a colour difference. The X5 scan is direct from FlexColor with all settings zeroed, and sharpening off. The OF120 scan has had some magenta removed from the highlights and shadows, and contrast reduced slightly. The FlexColor scan is a remarkably accurate representation of the slide on the light table, to my eyes. The greens especially are more accurate. The OF120 scan seems to be lacking a certain amount of tonal separation in the higher midtones. Still, I’m not sure there’s $23’000’s worth of difference.

So what about detail? Slide film is generally sharper than negative film, so this also could be more challenging.  Note, however, I’m not really very familiar with the Linhof 612 yet, and I have some question if I was using an optimal aperture here.

Provia_of120_x5_stick

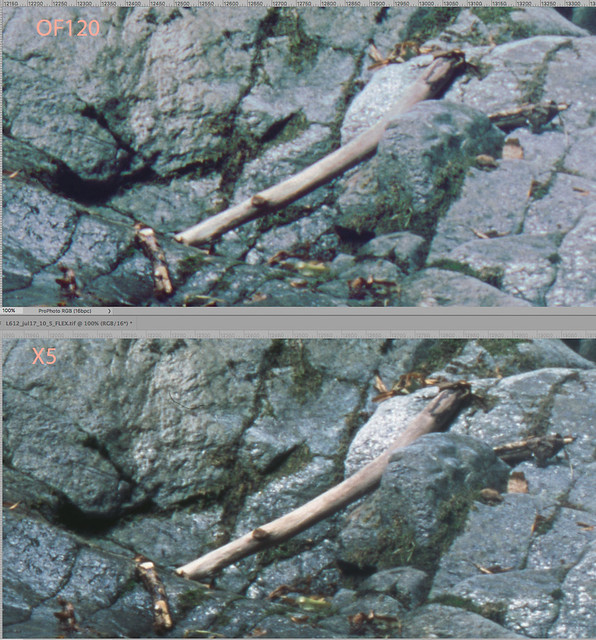
Top: Plustek OpticFilm 120 (OF120), bottom: Hasselblad Flextight X5 (X5)

In the above illustration I have downsampled the Plustek scan to 3200dpi. Although contrast and micro-contrast might be playing a part here, I have to - just - give the prize to the X5. Looking at the tree branch, you can see a smidgeon more detail. But let’s face it, unless you make a print the size of a bus, it is totally insignificant.

Note though, if you allow FlexColor to do post-capture sharpening, the gap widens considerably. FlexColor appears to have very good sharpening algorithms, tuned to scan resolution and scan type.  Silverfast’s USM on “automatic” setting is also not so bad. But nowhere as good as the FlexColor / Flextight combination. Still, there are many options for sharpening.

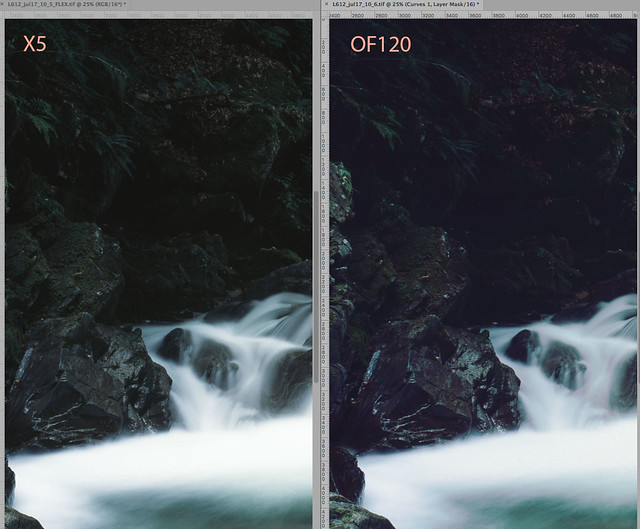
However, there is one area where the X5 nails it. Just as we saw for the XPan slide scans, for shadow detail the X5 wins easily.  In the sample below, I haven’t even touched the shadow depth slider in FlexColor, which can widen the difference still further with significant downside.

provia_shadow_of120_x5

Shadow detail - left: Hasselblad Flextight X5 (X5), right Plustek OpticFilm 120 (OF120)

So, from this point of view, it is difficult to avoid envious glances in the direction of the X5, or at least it’s X1 sibling, which is only astronomically priced rather than absurdly.

But wait.  There’s an elephant in the room, keeping very quiet over there in the corner. Well, a very small elephant.  Take a look at this:

canon_compare_provia

Same slide scanned using the Canoscan 9000F

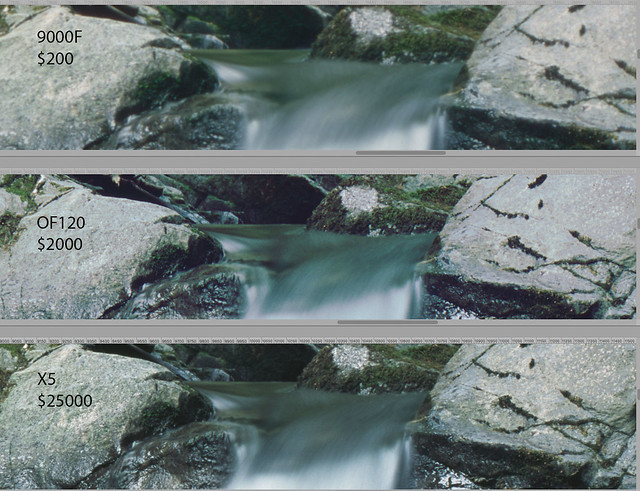
The above version was scanned on the Canoscan 9000F flatbed scanner using Silverfast Ai Studio, calibrated with the same IT8 slide as the OF120. This is straight from the scanner, with all Silverfast settings flat. The colour accuracy is quite noticeably better than the pre-adjusted OF120 version, and it appears to have more shadow depth.

This is a bit scary. So what about resolution ?

provia_3up_compare

1:1 - top: Canoscan 9000F, middle OpticFilm 120, bottom: Flextight X5 (X5)

Well, the 9000F can’t quite keep up, but at less than 1/100th of the cost of the X5, I guess it does a reasonable job. I only really bought the 9000F some years ago because I needed a document scanner, and remarkably it came bundled with Silverfast HDR: this was easily the cheapest way to acquire that software. So really I haven’t paid that much attention to it. It just sits there and does what it’s told. I am vaguely aware that it has a reputation of being rather under-appreciated, especially compared to Epson flatbeds.  These days you can pick up a 9000F MkII, sadly without Silverfast, for just $200. The film holders are truly horrible, but otherwise, it’s pretty good.

So, what about the OF120 vs X5 ? Well, I think the OF120 delivers quite enough resolution. Colour accuracy is another matter. Of course, one could blame Silverfast, but I have used the latest versio of Vuescan as well and have found similar issues. And the same Silverfast delivers much better results with the Canoscan.  I have made a whole series of Portra 400 scans with various combinations, which I may present as addendum, but in that case getting good colour out of the OF120/Silverfast combination proved quite a challenge.

On balance I think the Of120 put up a pretty good fight against the Flextight X5, but at the same time it is not as superior to the 9000F as it should be.  For scanning 35mm film I’d still go with the higher resolution of the OF120, but for medium format, honestly I’d be tempted to recommend the cheap but excellent Canoscan, or perhaps the more expensive but theoretically superior Epson V850 (which I’m tempted to try). One advantage that a dedicated film scanner should have is delivering better shadow depth and tonal separation for slide film. I’m not convinced that the OpticFilm 120 achieves that.

As a final note, I should point out that I haven’t yet extended testing to black & white film. That brings a completely different set of issues, and may well result in very different conclusions.  I don’t generally have much to do with black & white, but since I have 5 rolls of Ferrania P50 to burn through, I may have something to say on this later.

Finally, if you have any questions, feel free to ask…

Posted in Scanning on Wednesday, August 30, 2017 at 01:30 PM • PermalinkComments (13)

OpticFilm 120 vs. Flextight X5

Enter Goliath

in Scanning , Wednesday, August 23, 2017

Last week, I finally ended up doing something I’ve been wanting to do for years. I rented a Hasselblad Flextight X5 scanner for a few hours, at Light + Byte in Zürich. My basic objective was to find out if this scanner really is the miracle device some make it out to be, to find out how easy it is to use, and to evaluate if it would be a worthwhile investment in time and money, long term, to book regular sessions to scan my favourite shots. And, while I was at it, to benchmark my OpticFilm 120.

I think this is going to be the first of several posts, because fitting it all into one is going to end up far too long. I took several examples of film with me to scan, including XPan positive, XPan Scala, Linhof 612 positive and negative, and Bessa 667 positive and negative. I managed to get through a fair few of these, but not all.

In this post I’m going to concentrate on a couple of XPan Kodak E100G frames. I won’t say much about user experience of the Flextight X5 here, I’ll leave that for another post, but suffice it to say, while it is impressive, like all film scanners I’ve ever used, it is not free of issues.

All the Flextight scans were processed with FlexColor v4.8.13, and all OpticFilm 120 scans with current version of the Silverfast Archive Suite.

My first example is a photograph taken in Antarctica in 2013. On the light table this looks fabulous, but it is an absolute nightmare to scan. The detail in the shadowy “cave” area is quite apparent on the slide, but very hard to dig into with the scanner. And the very bright snow required pushing E100G’s exposure range to the edge. I’ve tried scanning this in the past with the Minolta Multi Pro and with the Opticfilm 120, with all the various combinations of multisampling and multi exposure, but getting acceptable shadow detail has been very difficult.

xpan-antarctica05-12

my most recent OpticFilm 120 interpretation of this frame

So, I loaded the slide into the X5, and created a “3F” raw scan, which allows me to play with it later as much as I want in FlexColor. This is very similar to creating an “HDR” file in Silverfast. Note, the stated resolution of the X5 when scanning 35mm film is 6300dpi.  That should be enough…

FlexColor produces some very flattering “default” output, and seems to have some special tricks up its sleeve regarding white/grey balance, but after some evaluation I’m a little wary of taking it fully at face value - flattering isn’t always the same as accurate. Anyway, here is what FlexColor delivers:

xpan-antarctica05-12-flex

Flextight X5 / FlexColor version

Obviously things like brightness and colour balance can be tweaked for ever, within the quite restricted range of flexibility. Although it would be nice to get an exact duplicate of how the slide looks on a light table (or rather, a specific light table), that’s not going to happen, for a very long list of reasons. This is just the nature of film scanning, and fighting against will only lead to frustration. But what we can hope for is to extend as far as possible the flexibility of the scanned file, to increase its tolerance to manipulation. This is where mumbo-jumbo stuff like “DMax” and “DeltaE” comes into play. I’m not going to get into that, I’m going to limit myself to subjectivity.

Ok, so let’s start looking at a few details. First of all, resolution, and (much) more important, focus. The OpticFilm 120 gets very maligned for its alleged suboptimal focus. It does not have autofocus, but rather fixed focus, with a lens depth of field which is designed, so they say, to ensure that all areas of the film are within the zone of sharp focus.  Actually, if you think about it, this is in theory a better plan than have auto focus on a very small area of the film with a lens with very narrow (we’re talking sub-millimetre here) depth of field. But geeks like to be in control. Of course, just because Plustek marketing tells us this works, this does not mean we have to believe it. The X5 does its own fully automated focus calibration. But anyway, lets take a look at some 1:1 zooms. Remember, the X5 is delivering 6300dpi, and OF120 “only” 5300dpi, so the sizes are a little different.

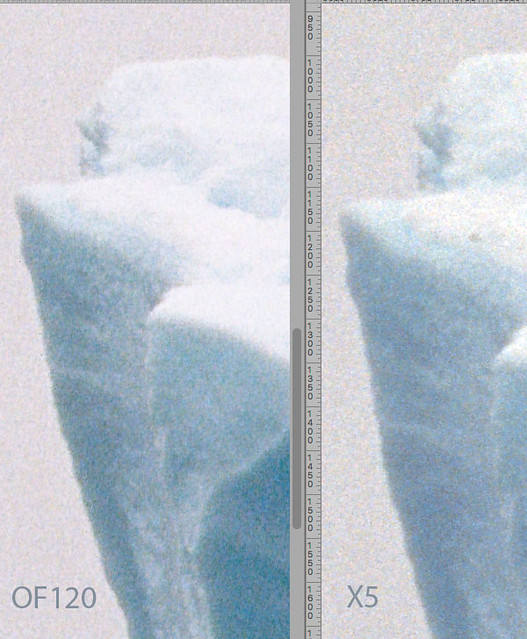
x5of120_1

Left tip of foreground iceberg zoomed at 1:1

Well, that’s quite interesting, isn’t it ? Just possibly the X5 is producing cleaner grain, but in terms of useful information, it’s pretty much a dead heat. Please don’t pay attention to highlight detail, by the way - there is a curve applied on the OF120 scan which is a touch too strong. The X5 has some kind of diffuse light source which should give cleaner grain, but honestly, at any kind of sensible print size you will not see any difference at all in resolution.  And sharpness ? Well, despite Internet forum prejudice, I don’t see that the OF120 has much to be ashamed of.

Let’s also remember a minor detail: the OF120 costs around €2’000. The X5 costs around €25’000 - TWENTY FIVE THOUSAND EUROS.  And the X5 has an obsolete Firewire interface, and software which has had no meaningful update in about a decade.

Ok, lets take a look at shadow detail. As I said above, this has been a big challenge with this slide.

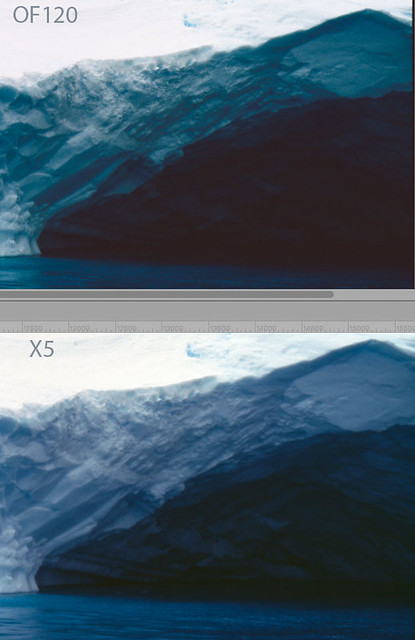
x5of120_2

The “cave”

Here we can see where the X5 starts to earn its keep. It is extracting a lot more usable detail in the deepest shadows, which may end being usable for a print - although it is still going to require some careful post-processing.  The OF120 doesn’t do too badly, but it can’t quite keep up, and any attempt to open up the shadows further just makes the image fall apart. So, for any extra €23’000, you can get a bit more shadow detail. Of course, sarcasm aside, to an exhibiting photographer selling through galleries, this can actually be worthwhile.

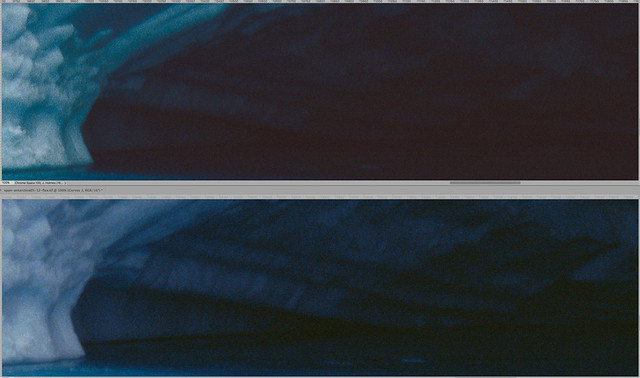
Looking in more detail, we can see that OF120 / Silverfast combination does a pretty good job in terms of noise suppression, and that the detail is very, very nearly there - but not quite.

x5of120_3

By the way, the colour difference is a result of adding a curve on the OF120 version to try to match the highlights on the X5 version. This introduced a slight green shift in mid-blues which I need to dial out. I haven’t actually bothered here, because getting an exact match of two completely independent impressions of a physical slide - neither of which match the slide perfectly - is a fool’s errand.  I repeat, accept that film scanning is a subjective activity, or accept that your head will explode.

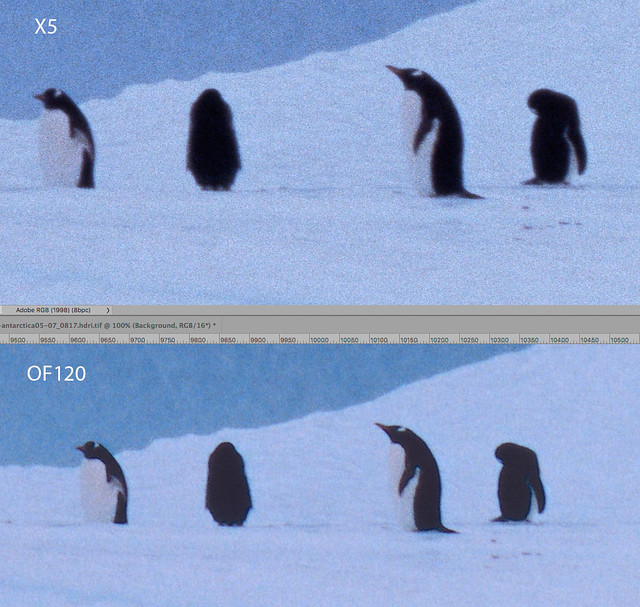
My second test case is even trickier. This is a frame with underexposed mid-tones but near blown highlights. It also has no neutral tones, and is predominately blue, which is neither scanner’s favourite channel. It was shot in very challenging conditions, doubly so for a manual focus film camera. But it is worth working on - a shot taking a few seconds earlier, with slightly different framing, is by far my post popular on social networking.

11-002-penguins

Example 2 - the penguins. This version is from the X5, but required quite some manipulation in FlexColor. It’s quite close to the original.

Zooming in on the stars of the show, once again in terms of real detail and focus there isn’t much to separate the two versions.

x5of120_4

The grain is a bit smoother on the X5 version, and to be honest the initial colour out of FlexColor (not shown here) is probably better than that out of Silverfast HDR. However I’m working from a very small sample here, and with intentionally challenging slides. I’m not sure if the difference is worth €23’000.

You may have noticed that I haven’t mentioned that there is a cheaper less eye-waveringly expensive version of the X5 called the X1.  I haven’t tried it. It offers less resolution than the X5, and probably more significantly, does not include the X5’s diffuse light source. It costs around €16’000.

So, based on what I can see here, for scanning XPan film, the Plustek OpticFilm 120 is comparatively a real bargain - albeit itself not cheap. The Hasselblad Flextight X5 returns higher resolution scans, but with two examples here, it seems that the OpticFilm 120 already outresolves the film-lens combination. And XPan lenses are very sharp. Possibly using some ultra-high resolution, ultra-low ISO monochrome file, Adox something or the other, we might see an advantage to the X5, but that film has very little practical use for me anyway. The X5 can also extract more deep shadow detail from slide film, which could be useful now and then.

So, technically, a win here for the Flextight X5, but I’d say the OpticFilm 120 is the moral victor. That’s all for now - following posts will look at medium format scans, and describe what it is like to work with the Flextight.


Posted in Scanning on Wednesday, August 23, 2017 at 05:23 PM • PermalinkComments ()

How sharp is your scan ?

..and it’s grain you need to show

in Scanning , Wednesday, May 03, 2017

The object of this review is perhaps not the most enthralling I’ve ever covered. It is, to be exact, an exposed piece of film, a piece of positive “slide” Agfa film in fact. It isn’t even in colour. It is in fact a Resolution Target (USAF 1951), produced by LaserSoft Imaging. You can read all about it here.

There was a special off on these a few weeks back - they quite often happen - and so it was quite a handy retail therapy opportunity. But apart from feeding the inner consumer, you may well ask “what is the point” ?

Resolution target

Resolution Target (USAF 1951)

Well, there are two points. The first is perhaps the most initially compelling, as it gives you a standard reference target with which, following the detailed instructions, you can determine the actual optical resolution of your scanner. This then gives a warm fuzzy feeling and bragging rights over all your scanner owning friends (or of course it might leave you feeling extremely depressed).

Unless you own hundreds of scanners, that’s pretty much the end of it. I own two, so I was kept happily entertained for over 5 minutes!  But, actually, it isn’t the end of it all, because as the instructions explain, there is something else you can use this target for, which turns out to be very enlightening.

The second use is to experiment with different scanner sharpening settings to determine what the optimum settings are. This was quite an eye-opener. I’d always tended to leave sharpening to Photoshop, and some mumbo-jumbo laden plug-in, as I’m too lazy or stupid to really get the details of all this radius, strength and masking stuff. Using the target in conjunction with Silverfast’s USM tool allowed me to quickly determine the best settings for restoring sharpness lost in the scanning process, without overdoing things. It also revealed that the adaptive “Auto Sharpness” mode in USM actually does a pretty good job.  By way of illustration, if I used USM, I tended (for no really good reason) to keep Power in a range of around 100-150. Auto Sharpness, for a full resolution positive 6x9 MF scan set Power at 300 - it goes up to 500. Zooming in at 1:1, it was clear that 100 was too weak, and 300 was not introducing any artefacts. I don’t know yet if this means I’ll switch to Silverfast USM for capture sharpening, but this experience certainly boosts my confidence in it, and it would be quite a time saver over doing it in Photoshop.

So, if you are interested, one, in seeing how much resolution your scanner actually delivers, and two, making the most of that resolution, this Silverfast Resolution Target (USAF 1951) is a good investment. I’m sure it would be equally useful for Vuescan users, there is nothing that ties it to Silverfast software.

Oh, and my results ? 4096 dpi real optical resolution for the Plustek Opticfilm 120, which while less than the advertised 5300 dpi, is pretty much as good as it gets for desktop film scanners. The revered Nikon Coolscan 8000 / 9000 reputedly do hit their advertised 4000 dpi. And apparently, the Opticfilm 120 could do even better with some way of fine tuning focus.  Anyway, 4096 dpi is quite enough for 35mm and 120 film, and this test confirms what I could see subjectively, comparing with scans from my old Minolta Dual Scan Multi Pro.

My Canon 9000F only managed 2048 dpi, less than half the advertised 4800, but that’s pretty much what I expected.

Posted in Scanning on Wednesday, May 03, 2017 at 10:34 PM • PermalinkComments (4)

The State of Film Scanning

not dead yet

in Scanning , Saturday, November 28, 2015

Prompted by a number of queries both in comments here and more frequently by email, and also by a very well written article on the Plustek OpticFilm 120 scanner, I have decided to write up my feeling on the current state of film scanning.

Xpan norway1506 2 09

First up, an appeal: people, please manage your expectations. Seriously. Film scanning is now right on the edge of a niche within a niche market - film photography - which is either small but stable, or still dwindling, depending on who you believe, and if you consider “Lomography” to be a genuine component of this market (I don’t). Film scanning requires a combination of a complex opto-electronic-mechanical device together with high specialised and complex software. And customers - well, the few that exist - are demanding a perfect solution at an increasingly low cost. Frankly it’s astonishing that any enterprises still find a viable business model in this space. And then when you narrow it down even more to medium format film scanning, it gets crazy.

Please correct my if I’m wrong, but I believe there are three current manufacturers of MF film scanners: Plustek, Reflecta, and Hasselblad. The Reflecta scanners are badge-engineered versions of a white-label device built in Taiwan and sold under several labels, including Pacific Imaging. The Hasselblad scanners are so mind-blowingly expensive that it is hard to imagine them having any customers other than major media companies or very well-funded public institutions. Which leaves Plustek. I don’t really know a lot about Plustek the company, but my impression is of a small but enthusiastic company in a very small pool, not unlike Cosina with rangefinder cameras - oh, wait.

Fifteen years ago the story was very, very different. There were at least 5 manufacturers active in desktop MF film scanners alone (Nikon, Minolta, Polaroid, Microtek, Imacon), with new models and innovations appearing regularly. Add to this several others producing 35mm models only (including Canon and Plustek), and you had a healthy market at a range of price points. There are of course still secondhand models to be found, but the prices tend to be insane, there is mostly no servicing or repair available, and people tend to hang on to scanners that work properly. As said before, these are complex, delicate devices, subject to considerable wear, and don’t last for ever. And drivers compatible with latest operating systems are unlikely to be found. So realistically, you need to rule out the second hand market if you’re planning on staying in film scanning for the foreseeable future. Note, there is another path, which is to buy a second-hand drum scanner. These formerly insanely expensive devices, found only in Pre-Press shops, can now be acquired for something close to a pittance. But wait - they are very complex to install, maintain, and operate, requiring specialist knowledge which is hard to find even on the internet. They are very large, very heavy, and very cumbersome. And as for software - usually dongle protected through something like Apple ADB - forget about compatibility with anything released after around 2005. At the latest. Some brave souls offer bespoke scanning services using these monsters. If you want the ultimate quality, because they really are very, very good, you could go in that direction.

Note though, Tim Parkin, who runs the above linked drum-scanning service, reviewed the Plustek OpticFilm 120 (paywalled), and had this to say (I’m quoting very selectively here): “What’s quite surprising is how good the Opticfilm 120 is compared with the Howtek (4500 Drum Scanner)”, and “The Opticfilm 120 is undoubtedly a very good scanner and if the film holder and focus issues can be addressed this should give results that are dramatically better than the Epson V750 and potentially on a par with the Nikon 9000”. This, with the caveats that he modified the film holder to use two glass inserts to hold the film flat, and that he stated he would not buy an OF 120 with the existing film holders.

This is a real shame, because Plustek clearly put a huge amount of thought and resources into the film holders, which are the best I’ve ever seen, better even than Minolta’s, and provided no fewer than 7 different types with the scanner. It is quite baffling why they do not provide, or at least sell, glass film holders, as based on Tim’s tests, this would elevate the scanner from “best of a poor bunch” to “best desktop film scanner ever”. It may be possible to hack together a holder or two, buying spares and anti-Newton glass inserts, but I’m really not very good at that stuff, not to mention lazy and impatient. Oh, and ugly. Finally, another caveat on the OF 120 is that your chances of getting a glitch-free copy seem to hover around 50%. My first one had a stuck pixel or two in the Infrared channel, and went back for servicing (a total hassle in Switzerland, where Plustek has no official distribution, which is not unusual for small companies, as we’re a small country and not in the EU - but the retailer, Heiniger AG, was very helpful, and eventually I got a brand new scanner). At least we see there the benefits of a warranty and active production.

So, that’s the hardware. The Plustek OpticFilm 120 is, in my opinion (based on 20 years of film scanning), the least-worst choice for a new desktop film scanner. Note, I’ve never tried the Reflecta MF–5000, but the German film scanner info site prefers it over the OF 120. I think they got exasperated with the OF 120’s glitches. To me the Reflecta looks a little clumsy, especially the 35mm holder, and I’m not sure it can scan XPan panoramic format, a must for me. As for the Hasselblad X1/X5, even hiring one for half a day is horrendously expensive. And they don’t even have dust / scratch removal.

Now, the software. And again, we need to manage our expectations here. I’m a Silverfast (by Lasersoft) user, and have been for a very long time. I’m under no illusions that Silverfast is perfect - it is software, after all - but I do believe it delivers the best combination of scan quality and workflow efficiency. Note, you do need to consider the software/hardware combination together. It is possible that for other combinations, you’ll get different results. However, Lasersoft are closely involved with the initial and ongoing development of the OpticFilm 120, to the extent that it has a Silverfast badge on the front, and the shipping box is dominated by Silverfast PR. So, I expect that if Silverfast is going to be optimal for any scanner, it’s this one.

Silverfast was stuck on Version 6.x for many years. It had grown into a bit of a monster, with newer features seemingly bolted on at random, and it was crippled, on the Mac, by being based on PowerPC APIs. It ran under Rosetta, but when Apple dropped that as fast as they could (typical a***h*le behaviour from Cupertino), we were stuck. It took Lasersoft a long time to respond, in the light of the parallel dramatic downturn in demand for scanning solutions, but eventually they delivered the completely reengineered Version 8. Well, v8 is still idiosyncratic - it wouldn’t be Silverfast otherwise - but in my opinion, the current v8.5 is their best ever.

A lot of people complain about Silverfast. Now, I’ll admit to long-term user bias, but I’m not fan boy. I’ve been using Apple kit since 1990, and I’m certainly no Apple apologist. I also have professional UX/UI Design experience, and I’m neither known for my willingness to compromise, nor to suffer fools gladly. But given all this, and agreeing that Silverfast has a bit of a learning curve, I cannot understand why people are so critical of it. It makes a very complicated set of tasks, i.e reliably capturing an image imprinted as a positive or negative on a physical transparency, into an optimal, accurate, colour-managed digital copy quite easy. It’s colour editing tools are far superior to Photoshop, when considered specifically for film scanning, although probably the subset of users which can understand and benefit from this is also getting smaller. Yes, it requires some learning time. So does Photoshop. Yes, the documentation for v8 is crap. So is Photoshop CC’s. It’s an industry trend, you don’t get manuals any more (but with a small outlay, you can buy Mark Segal’s excellent guide). Lasersoft customer support is included in the price. It’s a bit haphazard, and trying to find the link to submit a question through the web page is a stroke-inducing experience, but if instead you use the “Request Online Support” feature in the application, you get a very quick response. The heavily moderated forum is a marketing disaster area in my opinion, and it is really frustrating to see what, frankly, seems to be team of dedicated, approachable and responsive people making such an unholy mess of promoting themselves. But, baseline, Silverfast works, and works well, and if you invest a little time into understanding it’s more advanced features, you might well be surprised at how much it can do.

It would not be fair to not mention the alternatives to Silverfast. Well, realistically, there’s only one: VueScan. Yes, Reflecta has its proprietary CyberView (not terribly good apparently), and there are long lost options like Binuscan (a seriously weird product). But now there is only VueScan. I’ve had a few public run-ins with Vuescan here, and indeed one of those articles is, to my astonishment, the most visited of all my posts. For some scanners, VueScan is the only option under modern operating systems, and it is certainly the case that you can obtain equally good results with Vuescan in your workflow as with Silverfast, but in my opinion, and experience, it’s more cumbersome, much more hit & miss, and requires a lot more post-processing. But, doubtless, if you’ve used VueScan for many years you’ll be comfortable with it, and you’ll find Silverfast weird. VueScan costs less money than Silverfast, that’s an undeniably fact. Allegedly VueScan also has good customer support. This is debatable - if VueScan’s sole owner, designer, programmer, marketer and support guy, Ed Hamrick, takes a dislike to you, you’re screwed, despite being happy to take your money. Unfortunately Ed is a little cranky. Clearly he is also to commended for his Herculean efforts, but then again, if tomorrow he decides to retire, where does that leave VueScan?

On top of all this, people who say VueScan is easier (or even easy) to use must be living on a different planet - the one the user interface was designed on. Working out how to tell it where you want to save a scan to is complicated enough, but say you want to color calibrate your scanner: in Silverfast, you do this: load the calibration slide, press IT8 calibrate. That’s it. In VueScan: in Input menu, set “Profile Scanner”. Load the calibration slide. Preview. On the internet, find your calibration slide reference data file. Download it. In Color Menu, under Scanner IT8 data, press the “@“ button (which in Vuescan apparently means “file path”), located the downloaded file. Use another “@“ button to tell it where to save the profile. Press Scan. Oh, that’s it! (probably). And all that profile stuff hides in the same menu where you can set colour balance using crude sliders. Ok, I’m not saying none of this stuff works. Clearly, it does. But people saying that VueScan is “easier to use” ? Give me a break - cheaper, yes. Wider scanner compatibility, yes. Good enough output, certainly. But easier to use - well, possibly it’s a more satisfying challenge for digital imaging geeks, but for people for whom scanning is necessary evil on the path to getting good prints, I’m very doubtful.

VueScan SF menus

The File Output menus in VueScan (left) and Silverfast (right).  I know which one I find more intuitive. Of course neither follow anything approach OS UI guidelines, for no good reason I can see.

Of course it is all highly subjective. The upside is that we have two very competent competing solutions in the market. The downside is that commercial realities impose compromises on both.

So, to the people who’ve been mailing me in the past, and those who will do so in the future, all I can tell you is make your own choices, but be grateful you still have choices to make. Buying a software license for Vuescan or Silverfast is not just giving you access to the software, but encouraging the respective makers to continue. Same for hardware - Plustek and Reflecta (and clones) still make new, up to date film scanners for 35mm and Medium Format. Buying one gets you new hardware, a warranty, and customer support. And the right to nag their marketing teams to do better. Given the state of the film photography market, I’d say things are in better shape than we might have expected a few years back.

Posted in Scanning on Saturday, November 28, 2015 at 07:27 PM • PermalinkComments (1)

Page 1 of 2 pages  1 2 >