photoblogography - Just some stuff about photography

Hahnemühle Photo Rag Metallic

pedal to the metal

in Product reviews , Monday, August 08, 2022

Although printing is a major part of photography for me, I don’t think I’ve ever written anything much about it. Still less about print papers. One can find interminable articles online about printing with this or that paper, along with intensely scientific charts and endless technicalese and associated geekery, usually authored by retired male rocket scientists with a talent for taking the most godawful dull photos known to mankind.

Well, I’m no rocket scientist, and I don’t understand charts, but I was sufficiently delighted by a few recent prints to try my hand at “reviewing” a type of print paper. 

Some time ago in a minor fit of retail therapy I ordered a box of Hahnemühle Photo Rag Metallic paper, a “silvery-shimmering FineArt inkjet paper with a specially formulated inkjet coating for FineArt use”. I’m pretty conservative with printing, and although I have have experimented wildly with stuff like Bamboo paper, I’ve never pushed it this far. The retail therapy having done its job, the box stayed on the shelf until very recently, when finally I decided to give it a go. Having offloaded all the technical stuff about colour profiles, print settings, etc, to Colorbyte Software ImagePrint, all I needed to do was select the photos, load the paper into the printer and press “print”.

The results were very pleasing. It’s very difficult to convey anything through a photo of a print, especially when the key characteristic of that print is a silvery reflectivity, but I’ll try anyway:

A Hasselblad X1DII shot from some months ago. Local creepy abandoned graveyard.

The bullring at Les-Saintes-Marie-De-La-Mer, Camargue, France. Ricoh GRIII, a few weeks ago.

A shot of the dunes at L’Espiguette, Camargue, France. Olympus E-M1 MkIII, a few weeks ago.

The paper can be interesting for colour photos as well. Hasselblad X1DII, at home

At 340 gsm, Hahnemühle Photo Rag Metallic is I think the heaviest paper I’ve ever printed on. It has a very marked texture enhancing the silvery finish. Obviously, it doesn’t suit all subjects, but when it works, it works really well, and everybody who has seen my sample prints has been very enthusiastic about them (mainly about the paper, not the photos).

If you’re into printing, it’s worth trying out this paper. It isn’t as radical or gimmicky as it sounds, and is a really nice alternative to have to hand.

Posted in Product reviews on Monday, August 08, 2022 at 04:50 PM • PermalinkComments ()

Software

displacement activity I

in Post-processing , Tuesday, December 11, 2018

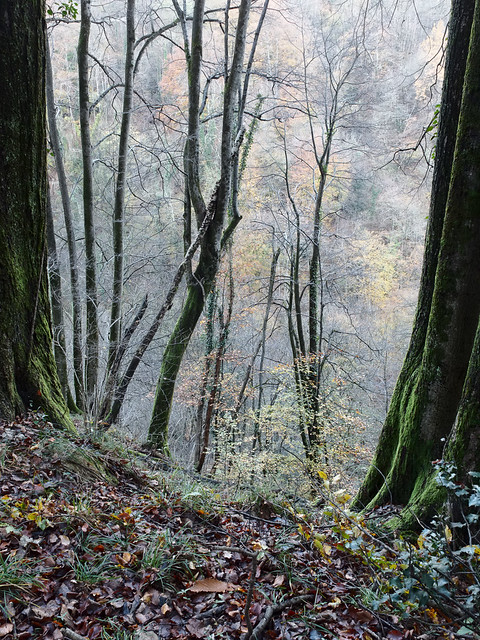
I’ve recently been going through some kind of phase where I’m reassessing a lot of my work. Initially this was on an aesthetic level, but somewhat inevitably technical considerations started to intervene. First of all, I have been trying to get a little more disciplined in my picture making. Although I like to think that I’m pretty much on top of the basics of using a camera, I have tended to be a little indisciplined in how I apply this knowledge. This then leads to, for example, photos with too much, or too little depth of field, because I was too lazy to think about optimising aperture. It all came about when I started to make prints of some of the recent series of woodland photos I’ve been making. In turn this led me to making a number of “test” prints (to be perfectly honest, I probably don’t make any other kind). And so I noticed that the colour in these prints was actually a bit weird, and so _then_ I just had to re-profile the paper, which more or less fixed the issue, but used up all my supplies. And left me wondering how my previous carefully created profile had “gone bad”. And off we go again.
Untangle II

“Untangle I” - the photo that led me to re-evaluate my printing

Or not - prompted by an article I saw recently, I wondered if maybe it might be a good idea to revisit ImagePrint by Colorbyte Software. I used to use ImagePrint with my Epson 2100 printer, but when this died, and some 8 years ago I splurged on an A2 Epson 3800, I would have had to upgrade my ImagePrint license, and I couldn’t afford it. So I bought a Pantone ColorMunki Photo kit instead, which allowed me to profile any printer paper I wanted. Of course this was not the only option: many paper manufacturer profiles are actually more than close enough, and if they’re not, various service providers can create custom profiles for a given paper and specific printer. But of course I wanted to do it all my own way, and now I think about it, I’ve gone through at least 3 printer profiling setups over the last 15 years or so, none cheap.  And in fact even with dedicated software and hardware, colour science, which this is an application of, is seriously hard and time consuming, apart from being a money drain.

ImagePrint on the other hand does absolutely everything for you. It includes a custom print driver which brings a number of tangible benefits, from more accurate colour to saving paper, and a huge library of expert print colour profiles tuned not only to printer/paper combinations, but also to different lighting conditions. The basic point of ImagePrint is that it offers 100% reliable, plug & play highest quality printing. So you can just forget about all the technical complexities and just enjoy the creative part. This to me is quite enough to justify the fairly high price, but on top of that there are myriad additional features which offer significant advantages in various printing scenarios.  So I renewed my license for the latest version, “ImagePrint Black”, and ever since I’ve been printing a lot more, with no test prints required.

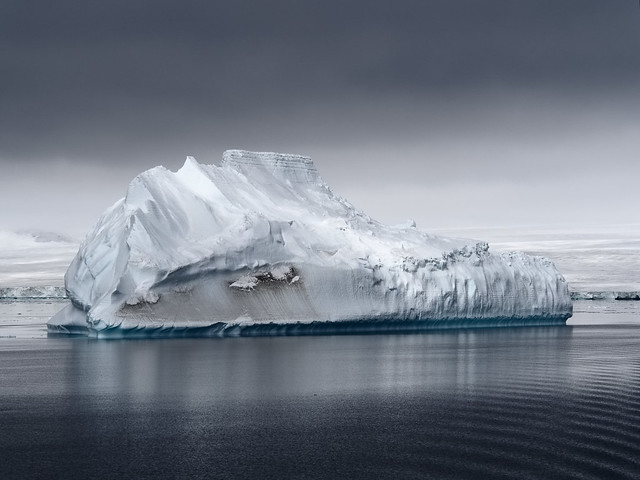
That solved my output problems. Next up was the input. I had been working on a set of photos recently for my 2018 calendar, and revisiting these I noticed that one of them was not quite right. This was a photo of an iceberg, which look fairly spectacular, but after I printed it (see above) I realised it was all a bit too, well, blue. So once again a trip down the rabbit hole of Raw conversion software beckoned. I decided to download a trial of the latest version of Capture One, v11 (now they’re on v12), and opened a few iceberg photos. One of them, not the one that had initially sent me into a spin, really shocked me: Capture One appeared to be showing textures completely missing in the Lightroom interpretation, and better fine detail as well. I cross-checked in Exposure X3, and in Iridient Developer, and the variation across these gave me the clue I needed to narrow the gap - it was simply a case of reducing the exposure, which in Lightroom seems to have a complex relationship with brightness. The much more involved Capture One default processing had, in this case, given better results.  As for the fine detail, well, there, at least with Olympus ORF files, the current iteration of Lightroom cannot match Capture One, or indeed the new Exposure X4. Both extract more real detail, although frankly only us pixel peepers would notice in almost all cases. But this comes with a price with Capture One, as any kind of noise reduction coupled with sharpening gives a horrible plasticky effect in recent ORF files. This is nothing new - I noticed it with v8 and it was just that made me decide to give up fighting and submit to Lightroom for once and for all.
Drm 20161203 PC030310 IridientEdit 3

“float” - the photo that used to be far too blue

However, Capture One has another major card up its sleeve, at least for me: the luminance curve. In Lightroom pretty much any change to contrast, by direct slider or by curve, has a major effect on saturation as well. Apparently this is by design, and it is stubbornly maintained, but personally I hate it. You can compensate by reducing saturation and/or vibrance, but first, this is imprecise, and second, why the hell should one need to? This naturally led me to the realisation that I should just be more disciplined with applying a previous strategy: do the Raw conversion in Iridient Developer, which is far less heavy handed, has not only a luminance curve, but also a chroma curve, and delivers the best detail and sharpness of all, then do the rest in Lightroom. Iridient even includes a Lightroom plug-in to facilitate all of this.

So, after this bit of re-evaluation, I have ended up with a software end to end process (I’m not going to call it a “workflow”, this is fun, not work) which drags the absolute best of my pitiful 16 Mpix sensor camera, and starts to approach the delicacy I’m always aiming for in colour and colour transitions.  Having got those variables out of the way, I can now concentrate on choosing the correct f-stop.

Posted in Post-processing on Tuesday, December 11, 2018 at 09:20 PM • PermalinkComments (1)

The Digital Print, by Jeff Schewe

mmm, such delicious crow

in Book Reviews , Thursday, August 20, 2015

I’m firmly of the belief that a photograph isn’t finished until it is printed. And yet I make very few prints. The reasons for this include a lack of time, a lack of space to hang them on the walls, a lack of people to show them to - nobody I know is interested - and not forgetting pure unadulterated sloth. And then, when I do decided to settle down and do some printing, stuff always goes wrong. Either the printer comes up with one of it’s various ruses to frustrate me, or I forget to set something up correctly, or the colour profiles have mysteriously corrupted themselves. And then when it does work technically, the print seems to lack a certain something. A couple of days ago, I was trying to print a photo taken back in June in Norway, and on paper it just looked flat and lifeless.

Drm 2015 06 04 P6042591 1

Flat & lifeless in Norway

It was mainly to address the last point that, pretty much on a whim, I decided to buy the eBook version of Jeff Schewe’s “The Digital Print”. A successful and award-winning commercial advertising photographer, Jeff Schewe has become a well-known and larger than life figure in the world of digital imaging. He’s a very strong advocate of all things Adobe, having been closely associated with the company since very early versions of Photoshop. While earning a lot of well-deserved respect he has also cultivated an abrasive online personality especially on the forums of the Luminous Landscape. To say he doesn’t take fools gladly - or indeed anybody expressing a divergent opinion - would be as much of an understatement as to say he quite likes Lightroom. Having followed his curt, rude dismissals of all and sundry over the years, I’d decided I couldn’t stand him. Ironically, a quick glance at pretty much any personnel report on me over the past 300 years will say pretty much exactly the same thing. And that’s in person, not online. Anyway, I refused to buy his two books “The Digital Negative” and “The Digital Print” because (a) I didn’t like “forum Schewe”, and (b) I was anti-Lightroom. Well, that was a serious case of cutting off my nose to spite my face.

As it turns out, “The Digital Print” is probably the best book on digital photography I’ve ever read. It has immediately made a significant improvement to the quality of the prints which I’m able to make. Rather than just provide a dry set of instructions, it has the knack of encouraging the reader to think about how to make a good print, of what it actually means to represent a digital image on paper, and then concisely and clearly provides the technical information you need. It focuses squarely on Adobe Photoshop and Adobe Lightroom, and mainly on Epson printers, although Canon gets a look in. I have an Epson printer and I use Photoshop to print, but generally I wouldn’t touch Lightroom with a bargepole. Apple (may they rot in corporate hell) forced me to abandon Aperture, and I now use Capture One, with round trip to Iridient Developer for top picks. But the presentation of Lightroom Print Module in “The Digital Negative” is the most persuasive argument I’ve ever seen to switch. Comparing a sharp ORF file with all sharpening turned off in Camera Raw and Capture One shows noticeably more detail in Capture One. But frankly it’s unlikely to be significant in a print. Still, another migration is too painful to contemplate, and in fact a large part of the content of the book is applicable to most imaging software.

“The Digital Negative” is written in a very accessible and concise style. There is humour (sorry, “humor”), but it’s never forced, like in so many of these books. And there is no padding, although the depth of the section on Colour Theory might seem a touch excessive. Really, I think most photographers just want to know how to setup colour management and get good printer profiles. The nuts and bolts under the hood are all very well, but frankly, about as relevant as a Photoshop binary dump to most people. But the rest, covering not only preparing and printing the file, but also selecting paper, displaying and storing prints is captivating. The very detailed section on managing Epson printer settings is worth the price on its own. I’ve found out some secrets about my Epson 3800 which I have eluded me over than five or six level six years that I’ve owned it. The end result is a big smile on my face and a lot of fun making prints.

So as you can tell, if you’re at all serious about printing digital images (and that includes scanned film, by the way), I thoroughly recommend this book and herewith will consume copious amounts of crow. I should probably buy Jeff Schewe a drink or five.


p.s. - Jeff, “tirer” in French also means “to print”. A photographic print is “un tirage”. I guess 27 million people have already told you this.


Posted in Book Reviews on Thursday, August 20, 2015 at 08:34 PM • PermalinkComments (2)

Venice by night

off the beaten track

in Photography , Monday, March 18, 2013

Of all the photos I took over my recent 3 day trip to Venice, this is my favourite, and the one I chose to print.  It’s also the first large (A3+ for now, but I’m going to make an A2 for framing) print I’ve made from a Sigma DP2M file, and the detail is just shockingly good. It’s difficult to settle for less now!

Drm dp2 20130302 0806

Ok, so it’s not the classic Venice shot by any stretch, but it’s the sort of atmosphere I was looking for. More Michael Dibdin than Agatha Christie.

I was also pleased to find that you can make long exposure photos with the Sigma with no particular problem. The auto white balance is pretty weird, but that is fairly easily fixed.

Posted in Photography on Monday, March 18, 2013 at 11:36 AM • PermalinkComments ()

Living dangerously

, Friday, November 07, 2003
As David Gilmour once put it, "thinking we're getting older and wiser, when we're just getting old".

This could apply to the illogical semi-annual process by which we spend a lot of money to make perfect good software work by "upgrading" it. Normally it all ends in tears, and takes 6 months to sort out, which leaves 6 months to forget the experience just in time for the Next Must Have.

Well last night I really went to town: I upgraded my Mac G4 workstation to OS X 10.3 (Panther), having first very very carefully applied firmware patches to my FireWire drives, and I upgraded Photoshop 7 to Photoshop CS. Finally I installed the Panther version of ImagePrint.

Amazingly it all worked, and even more amazingly it seems it was worth it.

I had already been using Panther on my G4 PowerBook for a week, and also upgraded by very non-critical Cube first as well. In that context I am disappointed with Panther - the collaboration features with Windows networks fall well short of my expectations, although careful reading of the fine print reveals that Apple delivered what they said they would.

But otherwise, Panther delivers the first really noticeable speed boost I've seen in OS X. It really seems about 25% faster. But the really big deal is Photoshop CS. This upgrade has got more new and really useful features than I think I've seen since layers were introduced waaaaay back in v3.0 (or was it 4?). Greatly enhanced 16-bit functionality would be enough in itself, but the new browser, the new Photo filters, filter layers, performance improvements and much more all make this really good value for money.

Adobe really has been working hard - InDesign CS is an equally valuable upgrade - the performance improvements here are staggering - especially in document scrolling.

However there was one little thing that struck me.... in order to apply FireWire firmware upgrades I had to boot in OS 9.2 .... and I was amazed by how fast it is. Of course I didn't experience a good old MacOS crash or try to do 2 things at once, but still....

Posted in on Friday, November 07, 2003 at 10:36 AM • PermalinkComments ()