photoblogography - Just some stuff about photography

OpticFilm 120 vs. Flextight X5 - Round 2

the plot thickens

in Scanning , Wednesday, August 30, 2017

Last week I published the first part of my Plutek OpticFilm 120 vs Hasselblad Flextight X5 scanner bake-off. The results from scanning XPan frames were surprisingly close, with the X5 subjectively winning by a whisker.

The key word in the above paragraph is “subjectively”. Because film scanning is nothing if not subjective. While preparing this second part, I once again fell down the rabbit hole of comparing output from different scanners, different software, different settings, reproducible bugs, irreproducible bugs, and indifferent customer support.  I learned, or-relearned, a couple of key points about scanning, which can be summed up by saying that magic features - like “multi-exposure” - generally don’t work. It’s better to keep to the basics.

That out of the way, this time around I’m going to look at two Medium Format scans, a Portra 400 negative taken with the Voigtländer Bessa III 667, and a Provia 100F positive taken with the Linhox 612.

First up, the Portra shot. This was taken in a secluded spot in Venice, far from the tourist gyres.  Note, you can click on any of these images to see them in larger size on Flickr.

b667_1_full

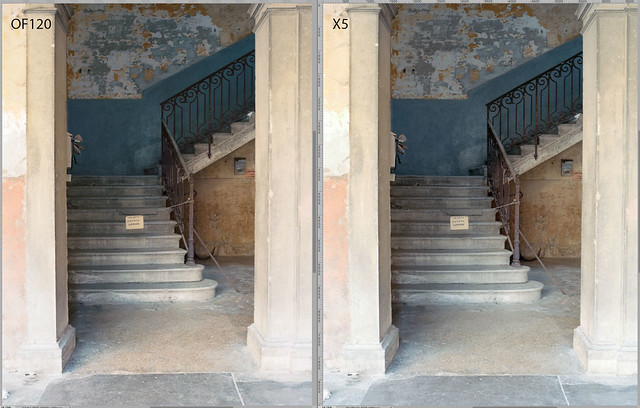
Left: Plustek OpticFilm 120 (OF120), right Hasselblad Flextight X5 (X5)

In this case I decided to apply a simple grey balance using the same reference (the letter box in the background, on the right) in Silverfast HDR for the OF120, and in FlexColor for the X5. For the OF120 I used Silverfast’s Negafix Portra 400 profile, for the X5 I used FlexColor’s Portra 400NC. As you can see, they’re pretty close. Preferences are subjective. I could show you a similar frame from my Sigma DP0, and you would see that there are differences, but if I went down that path it would never end.

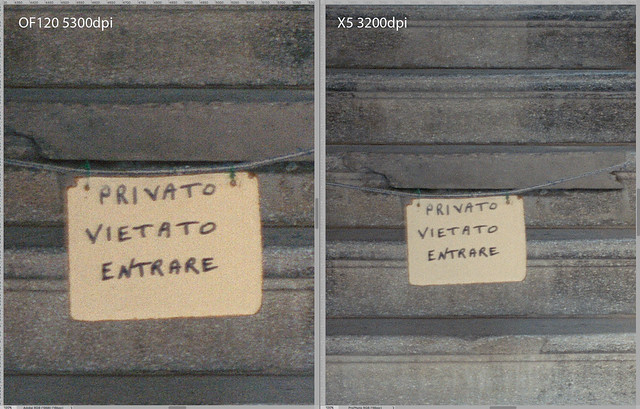
So, what about detail ? Well, I decided to zoom in on the notice in front of the staircase. Since the OF120 allows a scan a 5300dpi, and the X5 only at 3200dpi, the size at 1:1 is different.

b667_1_privato_original

1:1 zoom - left: Plustek OpticFilm 120 (OF120), right Hasselblad Flextight X5 (X5)

The extra resolution of the OF120 doesn’t really seem to add much, here. But it might be interesting to downsample to 3200dpi to get a better idea.

b667_1_privato_of_downsize

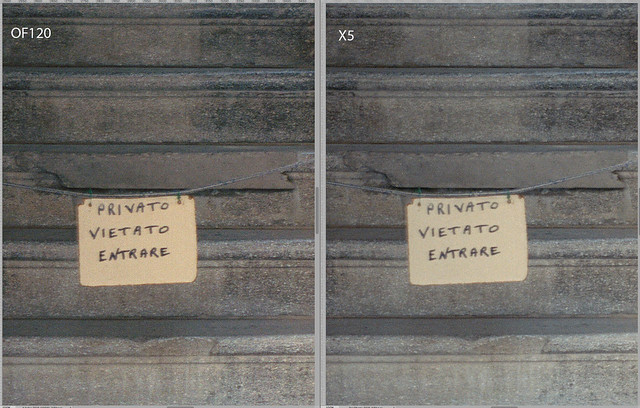
Matched resolution - left: Plustek OpticFilm 120 (OF120), right Hasselblad Flextight X5 (X5)

Well, that’s interesting, isn’t it ? As we saw in the last episode, the X5 is perhaps slightly less noisy, or possibly the diffuse light source is decreasing grain contrast, but in terms of resolution it’s pretty much a dead heat.  The OF120 scan is a little more contrasty, which may give the impression of more detail. On the other hand, it may really be delivering more detail.

So far so good, the Plustek has nothing to be ashamed about.  Let’s move on to the Provia frame. While colour negative film presents substantial challenges in colour representation, it is generally low contrast. Slide film , on the other hand, should present less problems for colour accuracy, but contrast is another matter altogether. Shadow areas can be extremely dense, and detail easily visible on a light table can be completely lost in a scan. Provia isn’t too bad in this respect, but Velvia is very tricky.  It’s just as well that I don’t much care for Velvia.

So, here’s our Provia frame:

provia_of120_x5

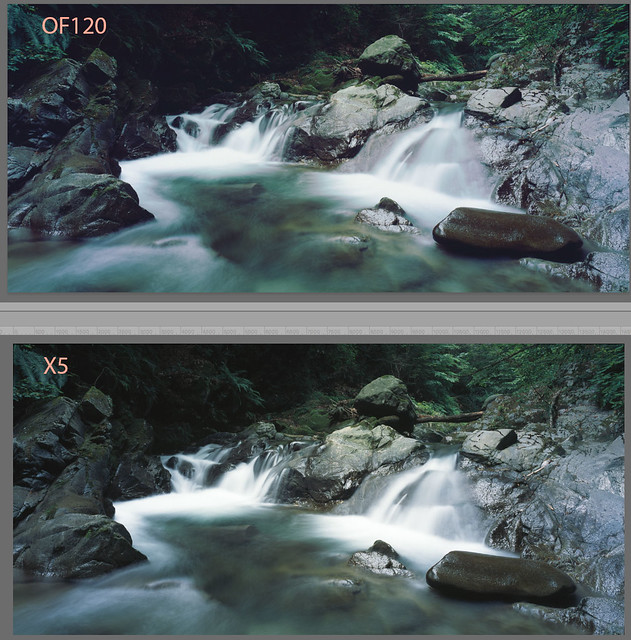
Top: Plustek OpticFilm 120 (OF120), bottom: Hasselblad Flextight X5 (X5)

You can immediately see a colour difference. The X5 scan is direct from FlexColor with all settings zeroed, and sharpening off. The OF120 scan has had some magenta removed from the highlights and shadows, and contrast reduced slightly. The FlexColor scan is a remarkably accurate representation of the slide on the light table, to my eyes. The greens especially are more accurate. The OF120 scan seems to be lacking a certain amount of tonal separation in the higher midtones. Still, I’m not sure there’s $23’000’s worth of difference.

So what about detail? Slide film is generally sharper than negative film, so this also could be more challenging.  Note, however, I’m not really very familiar with the Linhof 612 yet, and I have some question if I was using an optimal aperture here.

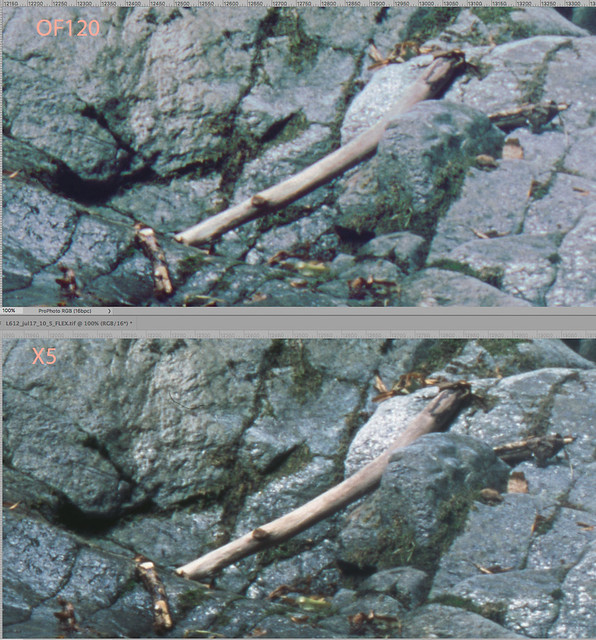
Provia_of120_x5_stick

Top: Plustek OpticFilm 120 (OF120), bottom: Hasselblad Flextight X5 (X5)

In the above illustration I have downsampled the Plustek scan to 3200dpi. Although contrast and micro-contrast might be playing a part here, I have to - just - give the prize to the X5. Looking at the tree branch, you can see a smidgeon more detail. But let’s face it, unless you make a print the size of a bus, it is totally insignificant.

Note though, if you allow FlexColor to do post-capture sharpening, the gap widens considerably. FlexColor appears to have very good sharpening algorithms, tuned to scan resolution and scan type.  Silverfast’s USM on “automatic” setting is also not so bad. But nowhere as good as the FlexColor / Flextight combination. Still, there are many options for sharpening.

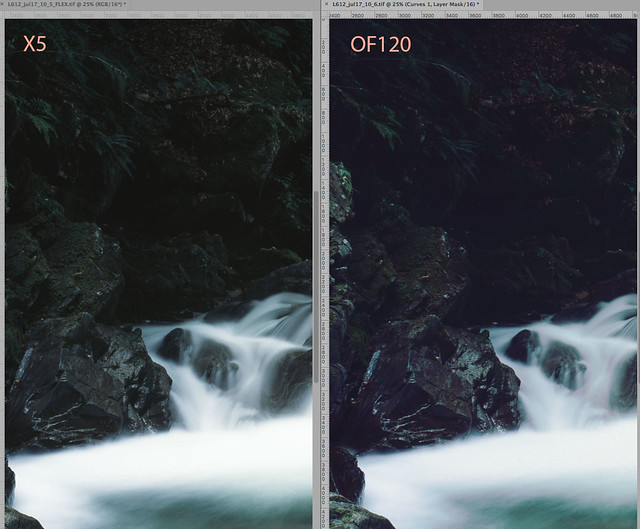
However, there is one area where the X5 nails it. Just as we saw for the XPan slide scans, for shadow detail the X5 wins easily.  In the sample below, I haven’t even touched the shadow depth slider in FlexColor, which can widen the difference still further with significant downside.

provia_shadow_of120_x5

Shadow detail - left: Hasselblad Flextight X5 (X5), right Plustek OpticFilm 120 (OF120)

So, from this point of view, it is difficult to avoid envious glances in the direction of the X5, or at least it’s X1 sibling, which is only astronomically priced rather than absurdly.

But wait.  There’s an elephant in the room, keeping very quiet over there in the corner. Well, a very small elephant.  Take a look at this:

canon_compare_provia

Same slide scanned using the Canoscan 9000F

The above version was scanned on the Canoscan 9000F flatbed scanner using Silverfast Ai Studio, calibrated with the same IT8 slide as the OF120. This is straight from the scanner, with all Silverfast settings flat. The colour accuracy is quite noticeably better than the pre-adjusted OF120 version, and it appears to have more shadow depth.

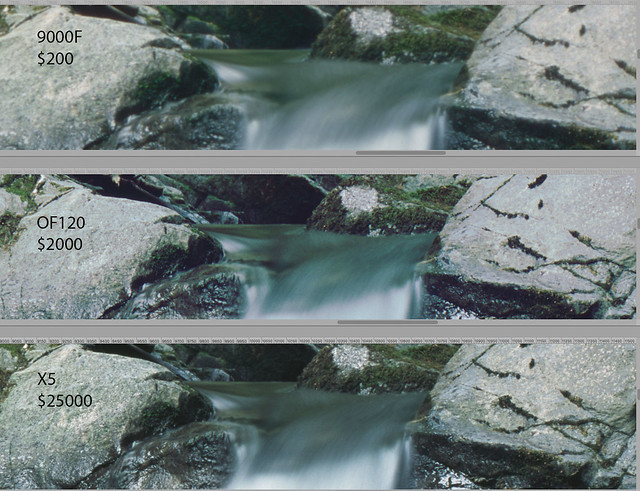
This is a bit scary. So what about resolution ?

provia_3up_compare

1:1 - top: Canoscan 9000F, middle OpticFilm 120, bottom: Flextight X5 (X5)

Well, the 9000F can’t quite keep up, but at less than 1/100th of the cost of the X5, I guess it does a reasonable job. I only really bought the 9000F some years ago because I needed a document scanner, and remarkably it came bundled with Silverfast HDR: this was easily the cheapest way to acquire that software. So really I haven’t paid that much attention to it. It just sits there and does what it’s told. I am vaguely aware that it has a reputation of being rather under-appreciated, especially compared to Epson flatbeds.  These days you can pick up a 9000F MkII, sadly without Silverfast, for just $200. The film holders are truly horrible, but otherwise, it’s pretty good.

So, what about the OF120 vs X5 ? Well, I think the OF120 delivers quite enough resolution. Colour accuracy is another matter. Of course, one could blame Silverfast, but I have used the latest versio of Vuescan as well and have found similar issues. And the same Silverfast delivers much better results with the Canoscan.  I have made a whole series of Portra 400 scans with various combinations, which I may present as addendum, but in that case getting good colour out of the OF120/Silverfast combination proved quite a challenge.

On balance I think the Of120 put up a pretty good fight against the Flextight X5, but at the same time it is not as superior to the 9000F as it should be.  For scanning 35mm film I’d still go with the higher resolution of the OF120, but for medium format, honestly I’d be tempted to recommend the cheap but excellent Canoscan, or perhaps the more expensive but theoretically superior Epson V850 (which I’m tempted to try). One advantage that a dedicated film scanner should have is delivering better shadow depth and tonal separation for slide film. I’m not convinced that the OpticFilm 120 achieves that.

As a final note, I should point out that I haven’t yet extended testing to black & white film. That brings a completely different set of issues, and may well result in very different conclusions.  I don’t generally have much to do with black & white, but since I have 5 rolls of Ferrania P50 to burn through, I may have something to say on this later.

Finally, if you have any questions, feel free to ask…

Posted in Scanning on Wednesday, August 30, 2017 at 01:30 PM • PermalinkComments (13)

OpticFilm 120 vs. Flextight X5

Enter Goliath

in Scanning , Wednesday, August 23, 2017

Last week, I finally ended up doing something I’ve been wanting to do for years. I rented a Hasselblad Flextight X5 scanner for a few hours, at Light + Byte in Zürich. My basic objective was to find out if this scanner really is the miracle device some make it out to be, to find out how easy it is to use, and to evaluate if it would be a worthwhile investment in time and money, long term, to book regular sessions to scan my favourite shots. And, while I was at it, to benchmark my OpticFilm 120.

I think this is going to be the first of several posts, because fitting it all into one is going to end up far too long. I took several examples of film with me to scan, including XPan positive, XPan Scala, Linhof 612 positive and negative, and Bessa 667 positive and negative. I managed to get through a fair few of these, but not all.

In this post I’m going to concentrate on a couple of XPan Kodak E100G frames. I won’t say much about user experience of the Flextight X5 here, I’ll leave that for another post, but suffice it to say, while it is impressive, like all film scanners I’ve ever used, it is not free of issues.

All the Flextight scans were processed with FlexColor v4.8.13, and all OpticFilm 120 scans with current version of the Silverfast Archive Suite.

My first example is a photograph taken in Antarctica in 2013. On the light table this looks fabulous, but it is an absolute nightmare to scan. The detail in the shadowy “cave” area is quite apparent on the slide, but very hard to dig into with the scanner. And the very bright snow required pushing E100G’s exposure range to the edge. I’ve tried scanning this in the past with the Minolta Multi Pro and with the Opticfilm 120, with all the various combinations of multisampling and multi exposure, but getting acceptable shadow detail has been very difficult.

xpan-antarctica05-12

my most recent OpticFilm 120 interpretation of this frame

So, I loaded the slide into the X5, and created a “3F” raw scan, which allows me to play with it later as much as I want in FlexColor. This is very similar to creating an “HDR” file in Silverfast. Note, the stated resolution of the X5 when scanning 35mm film is 6300dpi.  That should be enough…

FlexColor produces some very flattering “default” output, and seems to have some special tricks up its sleeve regarding white/grey balance, but after some evaluation I’m a little wary of taking it fully at face value - flattering isn’t always the same as accurate. Anyway, here is what FlexColor delivers:

xpan-antarctica05-12-flex

Flextight X5 / FlexColor version

Obviously things like brightness and colour balance can be tweaked for ever, within the quite restricted range of flexibility. Although it would be nice to get an exact duplicate of how the slide looks on a light table (or rather, a specific light table), that’s not going to happen, for a very long list of reasons. This is just the nature of film scanning, and fighting against will only lead to frustration. But what we can hope for is to extend as far as possible the flexibility of the scanned file, to increase its tolerance to manipulation. This is where mumbo-jumbo stuff like “DMax” and “DeltaE” comes into play. I’m not going to get into that, I’m going to limit myself to subjectivity.

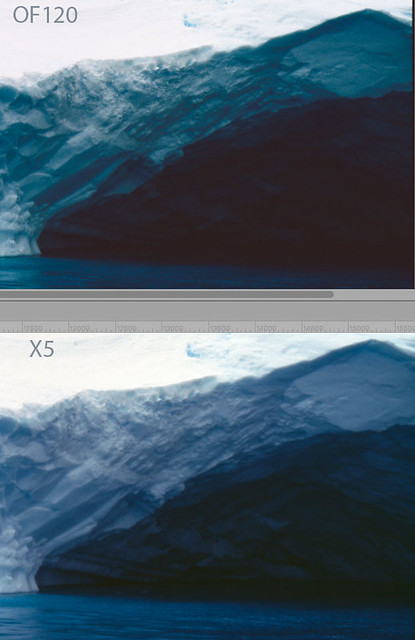
Ok, so let’s start looking at a few details. First of all, resolution, and (much) more important, focus. The OpticFilm 120 gets very maligned for its alleged suboptimal focus. It does not have autofocus, but rather fixed focus, with a lens depth of field which is designed, so they say, to ensure that all areas of the film are within the zone of sharp focus.  Actually, if you think about it, this is in theory a better plan than have auto focus on a very small area of the film with a lens with very narrow (we’re talking sub-millimetre here) depth of field. But geeks like to be in control. Of course, just because Plustek marketing tells us this works, this does not mean we have to believe it. The X5 does its own fully automated focus calibration. But anyway, lets take a look at some 1:1 zooms. Remember, the X5 is delivering 6300dpi, and OF120 “only” 5300dpi, so the sizes are a little different.

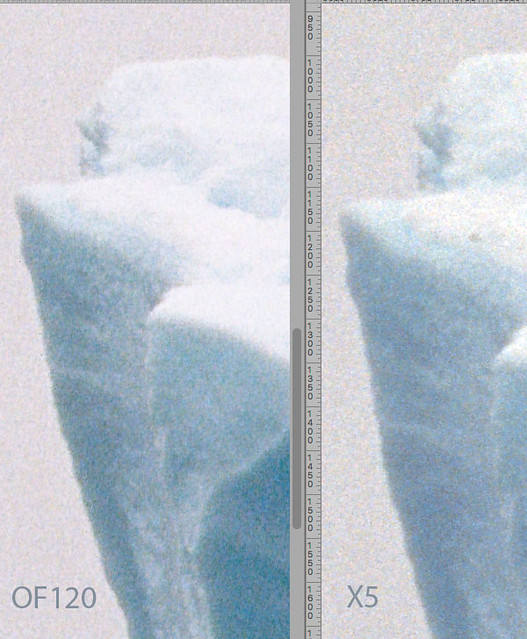
x5of120_1

Left tip of foreground iceberg zoomed at 1:1

Well, that’s quite interesting, isn’t it ? Just possibly the X5 is producing cleaner grain, but in terms of useful information, it’s pretty much a dead heat. Please don’t pay attention to highlight detail, by the way - there is a curve applied on the OF120 scan which is a touch too strong. The X5 has some kind of diffuse light source which should give cleaner grain, but honestly, at any kind of sensible print size you will not see any difference at all in resolution.  And sharpness ? Well, despite Internet forum prejudice, I don’t see that the OF120 has much to be ashamed of.

Let’s also remember a minor detail: the OF120 costs around €2’000. The X5 costs around €25’000 - TWENTY FIVE THOUSAND EUROS.  And the X5 has an obsolete Firewire interface, and software which has had no meaningful update in about a decade.

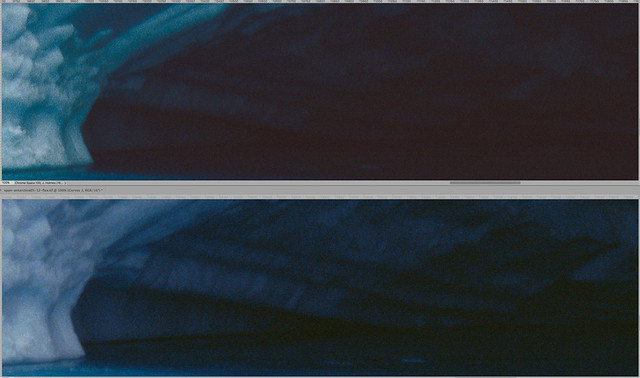
Ok, lets take a look at shadow detail. As I said above, this has been a big challenge with this slide.

x5of120_2

The “cave”

Here we can see where the X5 starts to earn its keep. It is extracting a lot more usable detail in the deepest shadows, which may end being usable for a print - although it is still going to require some careful post-processing.  The OF120 doesn’t do too badly, but it can’t quite keep up, and any attempt to open up the shadows further just makes the image fall apart. So, for any extra €23’000, you can get a bit more shadow detail. Of course, sarcasm aside, to an exhibiting photographer selling through galleries, this can actually be worthwhile.

Looking in more detail, we can see that OF120 / Silverfast combination does a pretty good job in terms of noise suppression, and that the detail is very, very nearly there - but not quite.

x5of120_3

By the way, the colour difference is a result of adding a curve on the OF120 version to try to match the highlights on the X5 version. This introduced a slight green shift in mid-blues which I need to dial out. I haven’t actually bothered here, because getting an exact match of two completely independent impressions of a physical slide - neither of which match the slide perfectly - is a fool’s errand.  I repeat, accept that film scanning is a subjective activity, or accept that your head will explode.

My second test case is even trickier. This is a frame with underexposed mid-tones but near blown highlights. It also has no neutral tones, and is predominately blue, which is neither scanner’s favourite channel. It was shot in very challenging conditions, doubly so for a manual focus film camera. But it is worth working on - a shot taking a few seconds earlier, with slightly different framing, is by far my post popular on social networking.

11-002-penguins

Example 2 - the penguins. This version is from the X5, but required quite some manipulation in FlexColor. It’s quite close to the original.

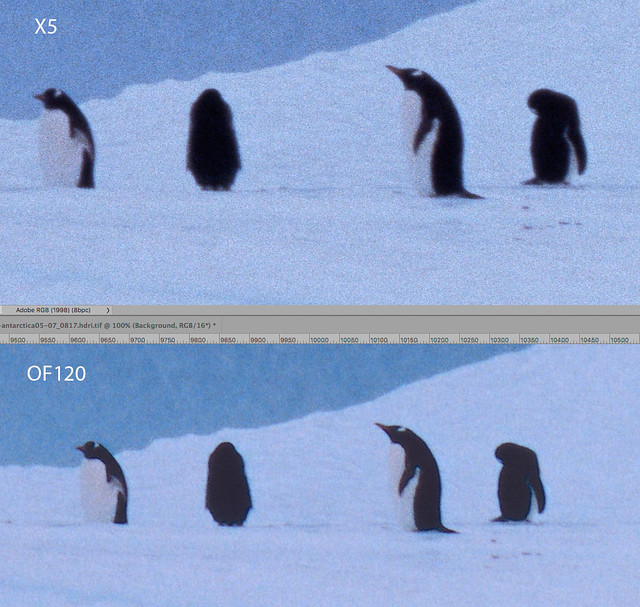
Zooming in on the stars of the show, once again in terms of real detail and focus there isn’t much to separate the two versions.

x5of120_4

The grain is a bit smoother on the X5 version, and to be honest the initial colour out of FlexColor (not shown here) is probably better than that out of Silverfast HDR. However I’m working from a very small sample here, and with intentionally challenging slides. I’m not sure if the difference is worth €23’000.

You may have noticed that I haven’t mentioned that there is a cheaper less eye-waveringly expensive version of the X5 called the X1.  I haven’t tried it. It offers less resolution than the X5, and probably more significantly, does not include the X5’s diffuse light source. It costs around €16’000.

So, based on what I can see here, for scanning XPan film, the Plustek OpticFilm 120 is comparatively a real bargain - albeit itself not cheap. The Hasselblad Flextight X5 returns higher resolution scans, but with two examples here, it seems that the OpticFilm 120 already outresolves the film-lens combination. And XPan lenses are very sharp. Possibly using some ultra-high resolution, ultra-low ISO monochrome file, Adox something or the other, we might see an advantage to the X5, but that film has very little practical use for me anyway. The X5 can also extract more deep shadow detail from slide film, which could be useful now and then.

So, technically, a win here for the Flextight X5, but I’d say the OpticFilm 120 is the moral victor. That’s all for now - following posts will look at medium format scans, and describe what it is like to work with the Flextight.


Posted in Scanning on Wednesday, August 23, 2017 at 05:23 PM • PermalinkComments ()

The Great Pano Bake-off

mirror mirror on the wall…

in Scanning , Monday, July 31, 2017

Having now added a Linhof 612 to my arsenal of wide-screen photographic tools, the time has come for a showdown. Which, if any, is the best? 

The candidates are, then:

  • Linhof 612 Medium Format film camera
  • Hasselblad XPan 35mm film camera
  • Sigma dp0 Quattro digital camera with Foveon sensor, 21:9 frame ratio

Now, you may say that I could substitute any digital camera for the dp0, and “just crop”. Well, you could, but I can’t, because accurate composition through the viewfinder is important to me. The dp0 comes close to the XPan with its wider lenses, but as far as I know all Sigma Quattro cameras, so dp0, dp1, dp2, dp3, sd and sd-H offer a 21:9 crop. I don’t know of any other cameras which do.

I’ve compared the dp0 with the XPan in the past, and concluded that the Sigma is certainly a valid contender for the title of “digital XPan”. Indeed, it replaced the XPan in my camera bag on my last trips to Iceland and Antarctica. But the Linhof, surely, with its huge frame size, should come out of top ?

For the film cameras of course we have another factor in the equation: the scanner. I’m pretty sure that the OpticFilm 120 at 5300dpi extracts at least 90% of the potential resolution from the exposed film, but I’m not fully convinced that it reaches 100%. Possibly a drum scanner or a Hasselblad Flextight could do marginally better, but if it takes a €15000+ scanner to outdo a €900 Sigma camera, then we’d be be getting into the realms of insanity.

Of course, the relative file sizes are a bit scary.  But I’ve got lots of disk space.

  • Linhof: 24533 x 11245 pixels, 1.5Gb
  • XPan: 13516 x 4986 pixels, 395Mb
  • Sigma: 5424 x 2328 pixels, 73Mb

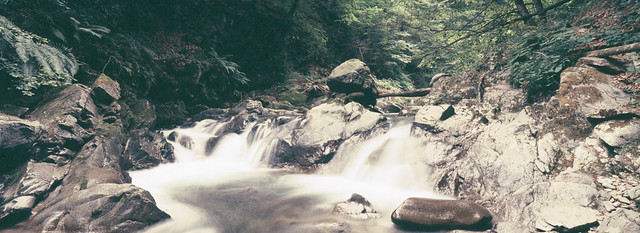
For the test, I trudged up (and down) to a local valley stream, set up the tripod, and shot frames from each camera. The scene was initially framed using the Linhof. The Linhof was loaded with Fuji Provia 100F, and had the 65mm lens mounted. The XPan, sadly, was loaded with Rollei Variochrome, set at ISO 200, in a parallel test described previously. I shot XPan frames with both the 45mm and 30mm lenses.  The Sigma of course had its fixed 14mm lens, which is roughly equivalent to 21mm for so-called “full frame”.

I was interested in two aspects: the different frame coverage, and the comparative resolution of each system. Colour was not really relevant in this particular exercise, although the differences are interesting.  But anyway I haven’t even attempted to try to match colour.

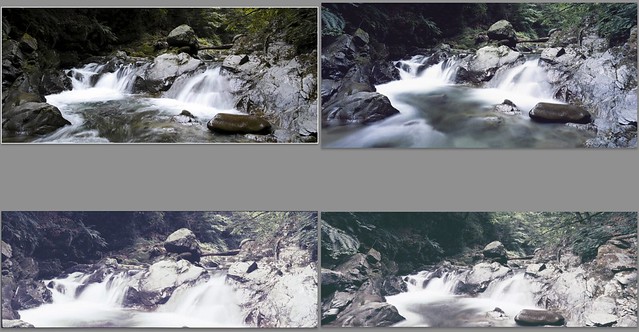
So, here are the “results”.  First, the comparative frame coverage.

panocompare_fullwidth

Clockwise from top left: Sigma dp0, Linhof 612 65mm, XPan 45mm, XPan 30mm.

It’s difficult, but please ignore the horrendous colour of the XPan frames. The scans are all “flat” from Silverfast - I have not attempted any kind of colour correction. The first thing that jumps out for me is how close the Sigma and Linhof are. I could get even closer by shooting a 2:3 frame on the Sigma and cropping it. The Linhof is just a touch wider. The XPan 30mm is the widest of all, and its vertical coverage is very similar to the Linhof. The XPan 45mm, in this company, and for this scene, is a bit neither here nor there.

Note, any attempt at choosing a “favourite” shot here is rather pointless. As I said above, the shot was framed for the Linhof, with the tripod remaining fixed for the other three, so I would expect (and indeed hope) to prefer the Linhof composition.

Working with the Linhof over the past month or so has confirmed my attachment to the (almost) 2:1 ratio. The Sigma ratio is actually closer than I expected, because the actual size of the exposed film on the Linhof is 12 x 5.5, so somewhat wider than a nominal 2:1. The Linhof has just one trick up its sleeve, but its a good one: the 8mm shift is hugely useful for this kind of shot. Note the difference between the Linhof and XPan 30mm frames: thanks to the shift (negative in this case), I’m able to put the extra vertical coverage to better use, without tilting up or down and hence distorting the perspective.  This limitation has always frustrated me with the XPan.

Now for resolution. Remember, with the Sigma, it being a digital camera with a Foveon 3 layer sensor, we can magnify up to 100% and expect sharp results.  With the film cameras it is way more complicated.  We need to factor in focussing (hyperfocal in this case), film flatness, film curl when scanning, scanner lens quality, scanner depth of field, and all the general characteristics of an analog to digital conversion.  Suffice it to say, film looks best on the light table, and goes downhill from then onwards. All we can do is damage limitation.

Having said all that, let’s look at a 100% section of each shot:

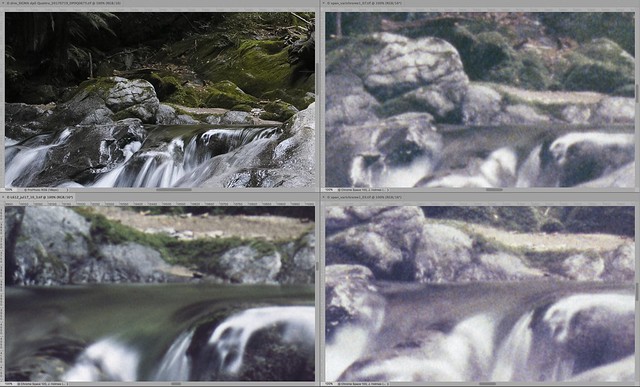
panocompare_100

100%: clockwise from top left: Sigma dp0, XPan 30mm, Linhof 612 65mm, XPan 45mm

In terms of numeric resolution, the Linhof clearly wins, but the level of actual information is debatable. There has been no sharpening applied here, so for the film shots what you see is what you get out of the scanner. What does appear to be the case is that the XPan lenses are actually sharper than the Schneider 65mm lens on the Linhof. One thing I’m finding with the Linhof is that objects at infinity seem to be quite soft, regardless of the focussing. I have no idea why this should be, but since focussing is by scale only, it isn’t straightforward to verify. Again, there are a lot of variables in the system.

Another way to compare is to try to adjust zoom to get roughly the same field of view, as follows.  Since the Sigma has the lowest nominal resolution, it defines the baseline.

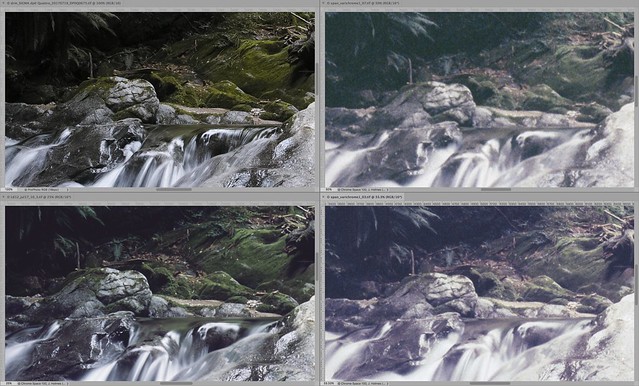
panocompare_match

Matched view: clockwise from top left: Sigma dp0, XPan 30mm, Linhof 612 65mm, XPan 45mm

Now there’s not so much in it. The XPan with 45mm trails slightly, at least in this example, but otherwise the level of detail is close. Probably if the XPan had been loaded with Provia 100F then the difference would be smaller. With the Sigma there is a higher level of micro-contrast and acuity, but appropriate processing of the film images can close the gap.

Note, when printing these images at the maximum size I can achieve on my A2 printer, in all cases there is quite sufficient resolution, so this exercise in pixel peeping should be taken with several grains of salt.

However, the clear conclusion is so far that the Sigma dp0, which is more practical, lighter, considerably less expensive and offers immediate feedback, is pretty much a match for either of the film cameras on a technical level. To be honest it is probably the best of the three, in purely technical terms, and in the right conditions.

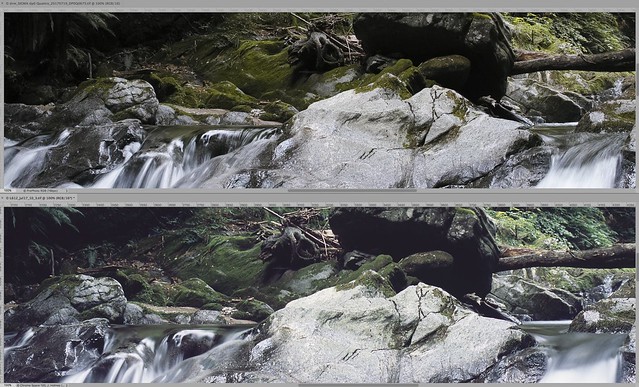
Let’s briefly compare the dp0 just with the Linhof:

panocompare_dp0_linhof

Top: Sigma dp0, Bottom: Linhof 612 65mm

The Sigma definitely seems to give slightly more real resolution, although there is a hint of some variation across the frame from the Linhof. But in the best case scenario, the Linhof / Plustek OpticFilm 120 combination is a match for the Sigma dp0 in terms of effective resolution - no more.

So why use the Linhof, and why use film at all? Well, all is not rosy in the Sigma world. Although it is not too apparent in this frame, it transitions to over-exposures in a very harsh and unpleasant way. With scenes featuring flowing water, for example, you need to be extremely careful with exposure.  And since the Sigma’s output is nowhere near as malleable as that of almost all other modern digital cameras, you have to very careful indeed. Actually it is this poor handling of highlights which makes more hesitate about investing in the Sigma sd Quattro system.

Of course, you also have to be careful with slide film, but even slide film with its aversion to highlight overexposure handles transition to burn-out much more naturally.  The Linhof also features one of the absolute best viewfinders ever made. If in-the-field composition is important to you, as opposed to fix-it-in-Photoshop, then this is a big deal.  And finally, the killer feature, the “permanent shift” lens, which avoids the Achilles’ Heel of panoramic photography, vertical entering of compositions.

And what about the poor old XPan? Well, it too has its advantages. First, the 30mm lens gives a wider field of view than either of the other two (although a Linhof 612PCII with 58mm lens would be wider).  The XPan also has a rangefinder, making manual focus very simple, and very reliable auto exposure.  And it is a quarter of the size of the Linhof 612. I’ve been using it for 17 years, and it’s not for sale. Yet.

And finally colour - although I like the colour output of the Sigma, it can be a little weird. Actually in the example here I used a custom colour profile in Lightroom. The rendition of Provia 100F, once the blue shadow cast is removed, is to my eyes more natural.  There is also something ever so slightly sterile about the Sigma output.

But finally, all three are great cameras which give me a lot of satisfaction.  If I was pushed to produce something on a tight deadline, if the subject permitted it I’d probably use the Sigma.  If I wanted the best control of composition I’d use the Linhof, with Provia 100F for landscape or Portrait 400 for urban work.  For maximum flexibility and discretion, the XPan.  In all three cases, I’d be able to print as large as I am able to with no compromises.

But I would love to see a drum scan of a Linhof 612 shot…


Posted in Scanning on Monday, July 31, 2017 at 11:16 AM • PermalinkComments (4)

Summer of ‘76 ?

not quite what I had in mind

in Film , Thursday, July 27, 2017

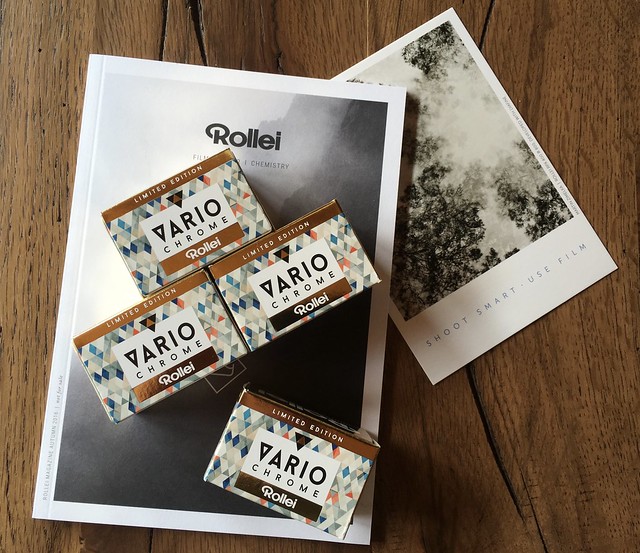
A little while back, there was a minor bit of excitement triggered on the photowebs with the announcement of a new reversal (”slide”) film under the Rollei brand, called Variochrome. It was supposed to be usable between ISO 200 and 400, although it is DX-coded at 200. Well, being a little tired of waiting around for Ferrania’s slide film (and indeed their P30 monochrome negative), out of curiosity I decided to order a few rolls. After all, there’s not a lot of competition for ISO 400 slide film these days.

rollei

I’ve just got the first roll back, shot on my XPan, and my general impression can be fully summed up in one word: disappointing.

I’m not sure what this film really is - “Rollei”, or rather, Maco Photo Products, don’t make their own, so it is repackaged something. The “limited edition” branding is in itself suspicious - why should it be limited, if it is new production? By the look of it, it is some kind of reject Agfa stock. It might hold its own as a retro-70s expired beige tinted novelty stock from Lomography, but packaged in a way which implies it is for serious use is totally inappropriate. Apart from the ghastly colour rendition, the film base is the flimsiest I’ve seen this side of Polachrome. Actually the whole experience is not unlike Polachrome.

xpan_varichrome1_01.jpg

Not quite what I had in mind


I wasn’t expecting fine grain or high resolution, and on those two fronts Variochrome doesn’t disappoint.

xpan_varichrome1_01_zoom.jpg

1:1 zoom at 5300dpi

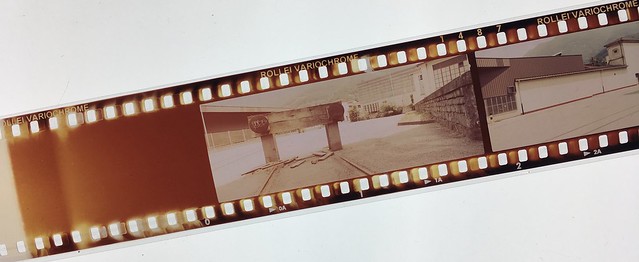
There also appears to be some light leakage effect on the leader and first two frames (well, last two given how the XPan works). I’ve never seen anything like that before, except if I accidentally opened the back, which I last did around 2001. Looks to me either to be a lab error, which is very unlikely - it would be the first ever from the lab I use these days - or light leaking into the canister.

variochrome1

Does anybody have any idea wth happened here ?

It is possible to kind of resurrect something using Silverfast’s excellent midtone correction tools, but it would be far better just to load up a roll of Provia 100F pushed 1 stop.

xpan_varichrome1_07b.jpg

Local river as Variochrom sees it…

xpan_varichrome1_07.jpg

Half-hearted attempt at rescue

Of course it could, just possibly, be a defective sample. Either that, or the marketing around this film is approaching the highly cynical. My advice - avoid at all costs, unless of course you like Abba.

(Actually, looking carefully, the few tiny samples on the Maco website do rather look like they were taken in 1976)

Posted in Film on Thursday, July 27, 2017 at 08:18 PM • PermalinkComments (2)

How sharp is your scan ?

..and it’s grain you need to show

in Scanning , Wednesday, May 03, 2017

The object of this review is perhaps not the most enthralling I’ve ever covered. It is, to be exact, an exposed piece of film, a piece of positive “slide” Agfa film in fact. It isn’t even in colour. It is in fact a Resolution Target (USAF 1951), produced by LaserSoft Imaging. You can read all about it here.

There was a special off on these a few weeks back - they quite often happen - and so it was quite a handy retail therapy opportunity. But apart from feeding the inner consumer, you may well ask “what is the point” ?

Resolution target

Resolution Target (USAF 1951)

Well, there are two points. The first is perhaps the most initially compelling, as it gives you a standard reference target with which, following the detailed instructions, you can determine the actual optical resolution of your scanner. This then gives a warm fuzzy feeling and bragging rights over all your scanner owning friends (or of course it might leave you feeling extremely depressed).

Unless you own hundreds of scanners, that’s pretty much the end of it. I own two, so I was kept happily entertained for over 5 minutes!  But, actually, it isn’t the end of it all, because as the instructions explain, there is something else you can use this target for, which turns out to be very enlightening.

The second use is to experiment with different scanner sharpening settings to determine what the optimum settings are. This was quite an eye-opener. I’d always tended to leave sharpening to Photoshop, and some mumbo-jumbo laden plug-in, as I’m too lazy or stupid to really get the details of all this radius, strength and masking stuff. Using the target in conjunction with Silverfast’s USM tool allowed me to quickly determine the best settings for restoring sharpness lost in the scanning process, without overdoing things. It also revealed that the adaptive “Auto Sharpness” mode in USM actually does a pretty good job.  By way of illustration, if I used USM, I tended (for no really good reason) to keep Power in a range of around 100-150. Auto Sharpness, for a full resolution positive 6x9 MF scan set Power at 300 - it goes up to 500. Zooming in at 1:1, it was clear that 100 was too weak, and 300 was not introducing any artefacts. I don’t know yet if this means I’ll switch to Silverfast USM for capture sharpening, but this experience certainly boosts my confidence in it, and it would be quite a time saver over doing it in Photoshop.

So, if you are interested, one, in seeing how much resolution your scanner actually delivers, and two, making the most of that resolution, this Silverfast Resolution Target (USAF 1951) is a good investment. I’m sure it would be equally useful for Vuescan users, there is nothing that ties it to Silverfast software.

Oh, and my results ? 4096 dpi real optical resolution for the Plustek Opticfilm 120, which while less than the advertised 5300 dpi, is pretty much as good as it gets for desktop film scanners. The revered Nikon Coolscan 8000 / 9000 reputedly do hit their advertised 4000 dpi. And apparently, the Opticfilm 120 could do even better with some way of fine tuning focus.  Anyway, 4096 dpi is quite enough for 35mm and 120 film, and this test confirms what I could see subjectively, comparing with scans from my old Minolta Dual Scan Multi Pro.

My Canon 9000F only managed 2048 dpi, less than half the advertised 4800, but that’s pretty much what I expected.

Posted in Scanning on Wednesday, May 03, 2017 at 10:34 PM • PermalinkComments (4)

Page 2 of 9 pages  < 1 2 3 4 >  Last ›