photoblogography - Just some stuff about photography

OpticFilm 120 vs. Flextight X5

Enter Goliath

in Scanning , Wednesday, August 23, 2017

Last week, I finally ended up doing something I’ve been wanting to do for years. I rented a Hasselblad Flextight X5 scanner for a few hours, at Light + Byte in Zürich. My basic objective was to find out if this scanner really is the miracle device some make it out to be, to find out how easy it is to use, and to evaluate if it would be a worthwhile investment in time and money, long term, to book regular sessions to scan my favourite shots. And, while I was at it, to benchmark my OpticFilm 120.

I think this is going to be the first of several posts, because fitting it all into one is going to end up far too long. I took several examples of film with me to scan, including XPan positive, XPan Scala, Linhof 612 positive and negative, and Bessa 667 positive and negative. I managed to get through a fair few of these, but not all.

In this post I’m going to concentrate on a couple of XPan Kodak E100G frames. I won’t say much about user experience of the Flextight X5 here, I’ll leave that for another post, but suffice it to say, while it is impressive, like all film scanners I’ve ever used, it is not free of issues.

All the Flextight scans were processed with FlexColor v4.8.13, and all OpticFilm 120 scans with current version of the Silverfast Archive Suite.

My first example is a photograph taken in Antarctica in 2013. On the light table this looks fabulous, but it is an absolute nightmare to scan. The detail in the shadowy “cave” area is quite apparent on the slide, but very hard to dig into with the scanner. And the very bright snow required pushing E100G’s exposure range to the edge. I’ve tried scanning this in the past with the Minolta Multi Pro and with the Opticfilm 120, with all the various combinations of multisampling and multi exposure, but getting acceptable shadow detail has been very difficult.

xpan-antarctica05-12

my most recent OpticFilm 120 interpretation of this frame

So, I loaded the slide into the X5, and created a “3F” raw scan, which allows me to play with it later as much as I want in FlexColor. This is very similar to creating an “HDR” file in Silverfast. Note, the stated resolution of the X5 when scanning 35mm film is 6300dpi.  That should be enough…

FlexColor produces some very flattering “default” output, and seems to have some special tricks up its sleeve regarding white/grey balance, but after some evaluation I’m a little wary of taking it fully at face value - flattering isn’t always the same as accurate. Anyway, here is what FlexColor delivers:

xpan-antarctica05-12-flex

Flextight X5 / FlexColor version

Obviously things like brightness and colour balance can be tweaked for ever, within the quite restricted range of flexibility. Although it would be nice to get an exact duplicate of how the slide looks on a light table (or rather, a specific light table), that’s not going to happen, for a very long list of reasons. This is just the nature of film scanning, and fighting against will only lead to frustration. But what we can hope for is to extend as far as possible the flexibility of the scanned file, to increase its tolerance to manipulation. This is where mumbo-jumbo stuff like “DMax” and “DeltaE” comes into play. I’m not going to get into that, I’m going to limit myself to subjectivity.

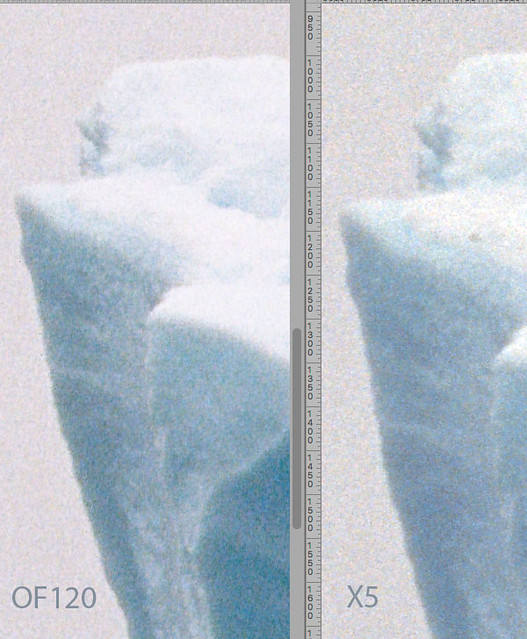
Ok, so let’s start looking at a few details. First of all, resolution, and (much) more important, focus. The OpticFilm 120 gets very maligned for its alleged suboptimal focus. It does not have autofocus, but rather fixed focus, with a lens depth of field which is designed, so they say, to ensure that all areas of the film are within the zone of sharp focus.  Actually, if you think about it, this is in theory a better plan than have auto focus on a very small area of the film with a lens with very narrow (we’re talking sub-millimetre here) depth of field. But geeks like to be in control. Of course, just because Plustek marketing tells us this works, this does not mean we have to believe it. The X5 does its own fully automated focus calibration. But anyway, lets take a look at some 1:1 zooms. Remember, the X5 is delivering 6300dpi, and OF120 “only” 5300dpi, so the sizes are a little different.

x5of120_1

Left tip of foreground iceberg zoomed at 1:1

Well, that’s quite interesting, isn’t it ? Just possibly the X5 is producing cleaner grain, but in terms of useful information, it’s pretty much a dead heat. Please don’t pay attention to highlight detail, by the way - there is a curve applied on the OF120 scan which is a touch too strong. The X5 has some kind of diffuse light source which should give cleaner grain, but honestly, at any kind of sensible print size you will not see any difference at all in resolution.  And sharpness ? Well, despite Internet forum prejudice, I don’t see that the OF120 has much to be ashamed of.

Let’s also remember a minor detail: the OF120 costs around €2’000. The X5 costs around €25’000 - TWENTY FIVE THOUSAND EUROS.  And the X5 has an obsolete Firewire interface, and software which has had no meaningful update in about a decade.

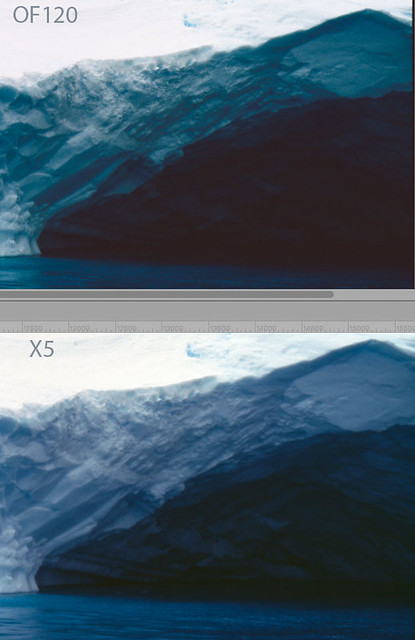
Ok, lets take a look at shadow detail. As I said above, this has been a big challenge with this slide.

x5of120_2

The “cave”

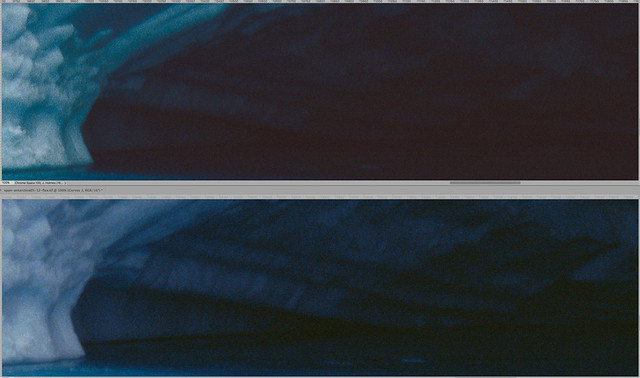
Here we can see where the X5 starts to earn its keep. It is extracting a lot more usable detail in the deepest shadows, which may end being usable for a print - although it is still going to require some careful post-processing.  The OF120 doesn’t do too badly, but it can’t quite keep up, and any attempt to open up the shadows further just makes the image fall apart. So, for any extra €23’000, you can get a bit more shadow detail. Of course, sarcasm aside, to an exhibiting photographer selling through galleries, this can actually be worthwhile.

Looking in more detail, we can see that OF120 / Silverfast combination does a pretty good job in terms of noise suppression, and that the detail is very, very nearly there - but not quite.

x5of120_3

By the way, the colour difference is a result of adding a curve on the OF120 version to try to match the highlights on the X5 version. This introduced a slight green shift in mid-blues which I need to dial out. I haven’t actually bothered here, because getting an exact match of two completely independent impressions of a physical slide - neither of which match the slide perfectly - is a fool’s errand.  I repeat, accept that film scanning is a subjective activity, or accept that your head will explode.

My second test case is even trickier. This is a frame with underexposed mid-tones but near blown highlights. It also has no neutral tones, and is predominately blue, which is neither scanner’s favourite channel. It was shot in very challenging conditions, doubly so for a manual focus film camera. But it is worth working on - a shot taking a few seconds earlier, with slightly different framing, is by far my post popular on social networking.

11-002-penguins

Example 2 - the penguins. This version is from the X5, but required quite some manipulation in FlexColor. It’s quite close to the original.

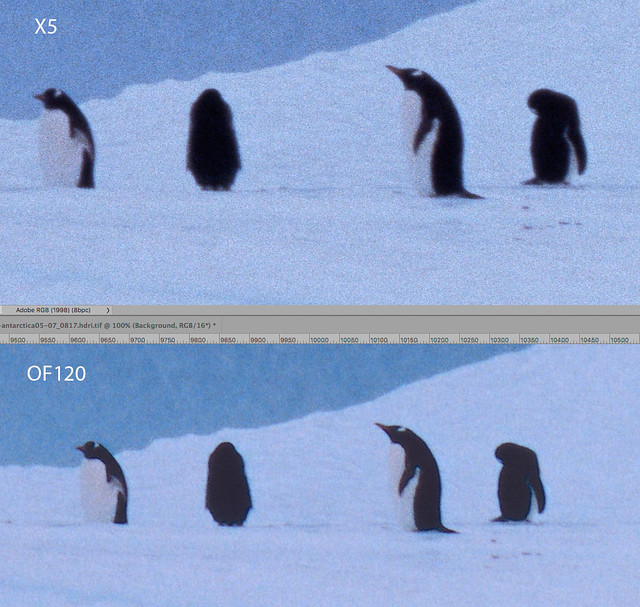
Zooming in on the stars of the show, once again in terms of real detail and focus there isn’t much to separate the two versions.

x5of120_4

The grain is a bit smoother on the X5 version, and to be honest the initial colour out of FlexColor (not shown here) is probably better than that out of Silverfast HDR. However I’m working from a very small sample here, and with intentionally challenging slides. I’m not sure if the difference is worth €23’000.

You may have noticed that I haven’t mentioned that there is a cheaper less eye-waveringly expensive version of the X5 called the X1.  I haven’t tried it. It offers less resolution than the X5, and probably more significantly, does not include the X5’s diffuse light source. It costs around €16’000.

So, based on what I can see here, for scanning XPan film, the Plustek OpticFilm 120 is comparatively a real bargain - albeit itself not cheap. The Hasselblad Flextight X5 returns higher resolution scans, but with two examples here, it seems that the OpticFilm 120 already outresolves the film-lens combination. And XPan lenses are very sharp. Possibly using some ultra-high resolution, ultra-low ISO monochrome file, Adox something or the other, we might see an advantage to the X5, but that film has very little practical use for me anyway. The X5 can also extract more deep shadow detail from slide film, which could be useful now and then.

So, technically, a win here for the Flextight X5, but I’d say the OpticFilm 120 is the moral victor. That’s all for now - following posts will look at medium format scans, and describe what it is like to work with the Flextight.


Posted in Scanning on Wednesday, August 23, 2017 at 05:23 PM • PermalinkComments ()

Isole Borromée

dusted down

in Photography , Thursday, June 15, 2017

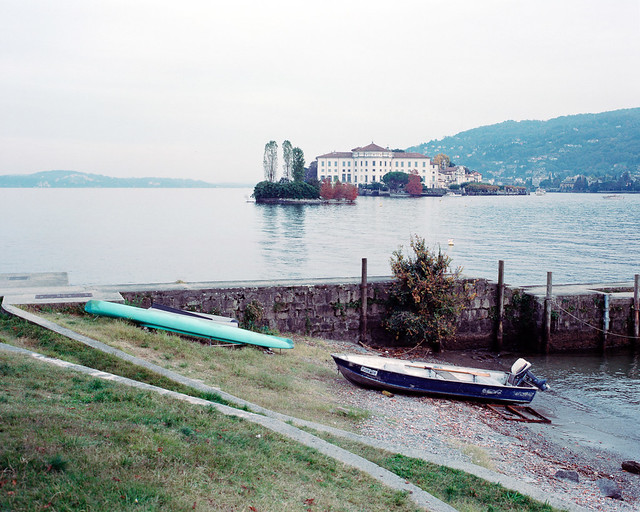
A couple of days ago I discovered on my desk a couple of sleeves of 120 film. These turned out to be from a small set I made nearly 2 years ago in the Borromean Islands in Lago Maggiore.  They are all 6x7 shots taken on Kodak Portra 400 (it’s what all the cool kids use, you know) using the Voigtlander Bessa III 667 (probably the best fixed lens medium format camera ever made - certainly the last, along with its 667w close relative).

drm_B667_Oct15_11_07.jpg
drm_B667_Oct15_13_06.jpg
drm_B667_Oct15_13_05.jpg
drm_B667_Oct15_11_05.jpg
drm_B667_Oct15_11_06.jpg

Portra 400 - photography’s answer to Dad Dancing.

Posted in Photography on Thursday, June 15, 2017 at 04:25 PM • PermalinkComments ()

How sharp is your scan ?

..and it’s grain you need to show

in Scanning , Wednesday, May 03, 2017

The object of this review is perhaps not the most enthralling I’ve ever covered. It is, to be exact, an exposed piece of film, a piece of positive “slide” Agfa film in fact. It isn’t even in colour. It is in fact a Resolution Target (USAF 1951), produced by LaserSoft Imaging. You can read all about it here.

There was a special off on these a few weeks back - they quite often happen - and so it was quite a handy retail therapy opportunity. But apart from feeding the inner consumer, you may well ask “what is the point” ?

Resolution target

Resolution Target (USAF 1951)

Well, there are two points. The first is perhaps the most initially compelling, as it gives you a standard reference target with which, following the detailed instructions, you can determine the actual optical resolution of your scanner. This then gives a warm fuzzy feeling and bragging rights over all your scanner owning friends (or of course it might leave you feeling extremely depressed).

Unless you own hundreds of scanners, that’s pretty much the end of it. I own two, so I was kept happily entertained for over 5 minutes!  But, actually, it isn’t the end of it all, because as the instructions explain, there is something else you can use this target for, which turns out to be very enlightening.

The second use is to experiment with different scanner sharpening settings to determine what the optimum settings are. This was quite an eye-opener. I’d always tended to leave sharpening to Photoshop, and some mumbo-jumbo laden plug-in, as I’m too lazy or stupid to really get the details of all this radius, strength and masking stuff. Using the target in conjunction with Silverfast’s USM tool allowed me to quickly determine the best settings for restoring sharpness lost in the scanning process, without overdoing things. It also revealed that the adaptive “Auto Sharpness” mode in USM actually does a pretty good job.  By way of illustration, if I used USM, I tended (for no really good reason) to keep Power in a range of around 100-150. Auto Sharpness, for a full resolution positive 6x9 MF scan set Power at 300 - it goes up to 500. Zooming in at 1:1, it was clear that 100 was too weak, and 300 was not introducing any artefacts. I don’t know yet if this means I’ll switch to Silverfast USM for capture sharpening, but this experience certainly boosts my confidence in it, and it would be quite a time saver over doing it in Photoshop.

So, if you are interested, one, in seeing how much resolution your scanner actually delivers, and two, making the most of that resolution, this Silverfast Resolution Target (USAF 1951) is a good investment. I’m sure it would be equally useful for Vuescan users, there is nothing that ties it to Silverfast software.

Oh, and my results ? 4096 dpi real optical resolution for the Plustek Opticfilm 120, which while less than the advertised 5300 dpi, is pretty much as good as it gets for desktop film scanners. The revered Nikon Coolscan 8000 / 9000 reputedly do hit their advertised 4000 dpi. And apparently, the Opticfilm 120 could do even better with some way of fine tuning focus.  Anyway, 4096 dpi is quite enough for 35mm and 120 film, and this test confirms what I could see subjectively, comparing with scans from my old Minolta Dual Scan Multi Pro.

My Canon 9000F only managed 2048 dpi, less than half the advertised 4800, but that’s pretty much what I expected.

Posted in Scanning on Wednesday, May 03, 2017 at 10:34 PM • PermalinkComments (4)

A roll of CineStill

still more film

in Film , Wednesday, March 29, 2017
I'm quite impressed with my first experience with CineStill 50 film. As promised, it is very fine grained, and allows for very sharp results, provided of course that operator issues such as focussing and scanning are carried out correctly. The exposure latitude also seems very good, probably quite similar to Portra 400. The character of the photos is interesting. More saturated than Portra, certainly, but not excessively so like Ektar.

xpan_cinestill1_14.jpg


Of course, at 50 ISO, even over-exposing by two stops, considering that the fastest XPan lenses only open up to f/4, hand-held it is strictly a bright daylight film.

This first roll is really pretty much throw away, just trying it out, and I had it developed by a 1 hour lab which does ok, but has no packaging for uncut film, so it ends up scratched and dirty.

And my somewhat interrupted love/hate relationship with Silverfast, and indeed Silverfast's makers, has resumed. Silverfast has had some more half-baked or oddball features added, but major issues remain (for example, why does it not cache iSDR results ? Why recalculate and reapply every single time, even if I just change the display type from "Corrected" to "Original" ? Why can I not add extra frames for batch scanning on my scanner ? And why, for heaven's sake, is their idea of a forum so unbelievably user-hostile ? I don't suppose we will ever know.

Anyway, here's a few more CineStill 50 shots. Up until now I'm using Negafix standard settings and correcting grey balance in Silverfast - one of the things it does exceptionally well. This grey balancing might be actually masking some special attribute of CineStill 50, but I'll think about that later.

xpan_cinestill1_07.jpg


xpan_cinestill1_08.jpg


xpan_cinestill1_02.jpg


xpan_cinestill1_16.hdr.jpg

Posted in Film on Wednesday, March 29, 2017 at 01:22 PM • PermalinkComments ()

Silverfast 8.8 revisited

sorry seems to be the hardest word

in Silverfast , Monday, January 04, 2016

It’s timely that I set out my motivations for writing this blog. Quite simply, it’s personal. I have nothing to sell, I’m not harvesting clicks, I’m not looking to grow a big audience or profile. Yes, to some extent I’d like to draw attention to my photography, despite having long ago realised firstly that this is futile, and secondly, being dependent on recognition is not a path to happiness or fulfilment. But I have no illusions or expectations that my opinions on anything amount to much, or provide anything other than very mild entertainment. I like to engage with readers, and try to answer queries and questions as best I can (most of these come via email, as a rule people don’t like commenting or debating in the public arena).

So, why is this timely? Well, I’ve been taken to task in quite a major way by a representative from Lasersoft for my last, rather unappreciative, posting on Silverfast. Since that also was via email, I will not go into details here, apart from to comment on the fact that posting it as a comment would have been far more beneficial to Lasersoft, as it shows that the company both listens and cares, and is hurt by what it sees, probably correctly, as unfair criticism. But it also reinforces that their handling of customer relations via social media needs improvement, and does their image and probably their sales a lot less good than it could.

But I will readdress my criticisms of Silverfast 8.8, and try to correct some inaccuracies.  First of all, it is again important that I set out my ground rules here. I am a paying customer of Silverfast. I have no special relationship with the company, indeed no relationship at all beyond being a customer. I have been using Silverfast for around 15 years, on Minolta, Canon and Plustek scanners, as well as the HDR version which reprocesses generic Silverfast scan files. Film photography is still important to me, and I scan standard 35mm, “panoramic” 35mm, and a range of medium format from 6x6 to 6x12. Silverfast is therefore “mission-critical” to what I do. I pay for it - and it isn’t cheap - and I expect it to work as advertised. When it works nominally, I’m very happy. When it does stuff that impresses me, I praise it. When it lets me down - which is not often - I get annoyed. When it lets me down badly, as it did recently, I get angry. And then I turn to Vuescan, and 5 minutes later, decide to give up film photography… (I know that Vuescan works for some people, but it doesn’t for me. Believe me, I’ve tried).

So, my position is that Lasersoft has a duty to me, and to other paying customers, to provide reliable software which performs the functions it is advertised to provide. In return, if I choose to write about Silverfast, I should do so fairly, and with attention to factual accuracy. Possibly neither party here has quite achieved this is the last iteration.

There is very, very little written about Silverfast on the web these days, at least not in English. Actually there’s not a great deal in Germain either. And a large proportion of that little amount is either recycled PR or individuals declaiming that “Silverfast sucks”, that it has “the worst GUI”, that it is “the worst software ever”, bla bla etc etc. None of these people have read the manual of course. Or, rather, they would not have read it if one existed. Which it doesn’t, still, for version 8, and this is a point that Lasersoft badly needs to address seriously. So, since I do write about the software and the process from time to time, reasonably fairly, and quite positively, I suppose it isn’t that surprising I get some traction on the topic, and very occasionally, some reaction from Lasersoft.

So let’s get back to 8.8. My basic problems seem to be associated with side effects of the introduction of SRDx. My rather rude dismissal of SRDx was more to do with the fact that it seemed to be destroying my workflow, rather than any actual evaluation. In fact I still haven’t evaluated it. But eventually I did what probably I should have done to start with, and used the “Reset Software” feature in both AI Studio and HDR Studio. This seemed to clear up some issues - although unfortunately it also appears to delete all of my stored presets - and I was able to complete the 64bit HDRi scans of the batch of 6x7 negatives I was working with. I ran out of time for running them through HDRi, though, although I did process one sample with SRD turned off. I’m not yet sure about the other issues I noticed, in particular the “black screen” where Silverfast seems to get confused about previews. This needs some dedicated time in order to try to replicate and report to user support.

I do retract the derogatory comments I made about the ColorServer feature, which in any case I’m in no position to evaluate. Actually I’m rather reassured that there is still professional customer demand for such a high end pro feature. And of course I made the classic mistake of assuming that since I could not, immediately, see any reason for using SRDx for digital camera file processing, then neither could anyone else. All of that was down to frustration arising from my own specific issues rather than any real complaint.

I think it is worth remembering that Silverfast has some absolutely world-class features. Just a few examples include the one-click scanner calibration, the 4-target neutral grey-balance tool, and the selective and global colour correction, which are at least on a par with recent and much lauded counterparts in CaptureOne v9. These together allow to arrive at an ideally balanced scan in way, way less time than it would take in Photoshop, even if you could work out how to do it there. Some other favourites of mine are the simultaneous, live input/output histograms and the Kodak Portra 400 NegaFix profile, which I find to be remarkably accurate. And in more recent releases, the greatly improved Job Manager, and especially the copy/paste settings feature, has saved me a lot of time.

There are areas that could be improved though, and a certain tendency towards UI bloopers which could be avoided with a little care and attention.  Simply as an example, I’m going to come back to the SRDx / iSRD issue.

When newly discovering v8.8, the first thing I’m going to look for is the banner feature, SRDx. But it isn’t there. In fact, for my Plustek OpticFilm 120 scanner, it’s hiding behind the iSRD button. Clicking on that reveals the Dust & Scratches panel, with two tabs - SRDx, and iSRD.

SilverFast SRD1

Initially SRDx is on top, which again, is a little weird as I’d clicked on the iSRD button. This then starts to make me wonder - is SRDx actually being promoted as superior to iSRD in all situations, including those for which IR Dust & Scratch removal works ? Is SRDx an alternative, or a complement, i.e can they work together ... or indeed should they? None of this is very clear from the interface. The mechanism that Silverfast uses in general to turn off an effect or tool is a checkbox in the title bar of the tool. It seems in this case that switching tabs activates the visible SRD option and deactivates the other, but to my mind this is weak feedback. Of course, ironically this is nothing new - the precursor to SRDx, plain vanilla SRD, lived in the same spot. But as it didn’t interest me, and was never visible by default, I never noticed.

So my conclusion must be that yes, the tabs are intended also as on/off switches. This goes against generally understood usage of tabs - as for example evident in Silverfish’s preferences popup - so I don’t think it is a good idea.

But in fact my attention was drawn to this simply because after playing around with these features a bit, I realised that the real time preview wasn’t working any more, for any tool, for example gradation. Otherwise I’d probably never have noticed!

Note, when the source file does not have a recognizable IR channel, or, I assume, the scanner does not have an IR channel, you get an SRDx button instead of iSRD…

SilverFast SRD2

...which, I guess, makes more sense of it all. But still, my feeling is that there must be a better way to do this for cases where both modes are available.

Final conclusion, I retract my recommendation to not touch 8.8, but as with any new release, I would say be careful, and unlike me, don’t install it when you’ve got some urgent work to do. That much is just common sense, which this time around eluded me.

I still think Silverfast is a great tool, and one that the film scanning community in particular is fortunate to still have around. The last point is on pricing. I mentioned that it costs €999. Well, yes, but that is for the fully loaded Archive Suite I use, and for the Plustek OpticFilm 120. And actually OpticFilm 120 comes with Ai Studio, priced at €658, and includes an IT8 6x7 calibration target. Depending on your scanner, the basic Archive solution comes in at €299 at the moment (hint, if you’ve got HDR Studio, you only need SE Plus as the scanning part, not Ai Studio). So yes, €999 is a bit of an extreme worst case scenario!

And then there are the entry and mid-level options, at much lower cost (under €50), and still featuring the same core scanning engine. Clearly it isn’t cheap. The competition is - at first glance - cheaper. But taking into account the output quality and the time it will save you, it’s hardly an unreasonable investment in an overall film photography budget.

So to start the New Year on a positive note, I apologise to the Silverfast team for my bad tempered rant, and I wish everybody reading this a happy and successful year of scanning. Even Vuescan users 😊

Posted in Silverfast on Monday, January 04, 2016 at 07:52 PM • PermalinkComments (2)

Page 2 of 8 pages  < 1 2 3 4 >  Last ›