photoblogography - Just some stuff about photography

Capture One for iPad

drop the laptop?

in Post-processing , Tuesday, February 28, 2023

I very much like the idea of CaptureOne on iPad. I participated in the Beta program, but at its conclusion, I could not see any immediate scenario where it would be of use to me. However, recently I decided to see how it could work for me in a real world scenario. I’ve just returned from a 10 day trip to Iceland, for which I did not take a laptop, just my iPad Air. I installed CaptureOne, which the idea that it could perform the following tasks:

- image ingestion
- quick quality check
- rough, indicative edits
- export to sharing services (Apple Photos, WhatsApp)
- image backup to SSD

I used three cameras, Olympus OM-1 (mainly), Ricoh GRIII, and Ricoh GRIIIx.

Overall this was successful. However, for now I will be pausing my subscription. There is no single reason for this, just a combination of things, as I will explain.

Starting with ingestion, when it works, it works absolutely fine. When connecting a camera via USB-C, I could either select the camera as a source, or go via the file system. Selecting the camera was better.  One very nice feature involved the OM-1: here I used the two card slots in parallel mode, recording to both at the same time. While Files saw both SD cards independently, so duplicating every file, Capture One presented single copies for import. The import screen also arranged files grouped by day, which allowed me to very quickly select and import the day’s work. Also, files already imported are recognised, and the app asks if I want to reimport or not. There was a glitch though: when plugging in the camera, I could only make it appear in Capture One’s browser by quitting (swipe up) and restarting the application. Even then sometimes it did not appear, and even when it did, it would appear for a moment then vanish. I had to perfect a technique where I would connect everything, restart Capture One, then as quickly as possible select the import source.  Once selected the connection never dropped.  I have no idea if this is an iOS or Capture One issue.  Also, I had a card reader with me, and I could not get Capture One to recognise this as a source, although it worked on initial testing before the trip.

After ingestion, Capture One presents the files under “Latest Import”. This makes it easy to select them, filter for raw files only, and move them to a dedicated Collection.

So, generally ingestion works very well, but the connection issues were frustrating and lost me considerable time.

Coming to quality checking, this is generally satisfactory. I can easily browse and select images, zoom in and out, view a histogram, all I need to do. Exposure warnings would be nice. However one issue I repeatedly encountered was that I could not fully move around an image when zoomed in, only a part of it. This was irritating. Still, I could very quickly verify critical issues such as focus, exposure and composition.

Capture One for iPad provides a basic set of image manipulation tools on a single layer only. Tool panels inherited from the desktop version included Exposure, HDR, Details (sharpness etc), basic Colour, and a few rather random things like Clarity and Dehaze. It’s limited but it’s enough for a quick sanity check, and to prepare initial versions for sharing. The Basic Characteristics panel is missing, which, given its name, I would have thought would have been a rather, er, basic feature, and of course there are no layers. The Curve and Levels tools are absent. There is a clumsy workaround if you own a desktop version of Capture One: you can create a style settings unavailable on iPad, and import it. Since the underlying engine does appear to be complete, this works.  So for example I created a couple of styles with generic Luma curves, which allowed me to get a rough idea of how my standard approach to editing on desktop would work.

So, rough, indicative edits, yes, but I’d throw everything away and start again on desktop, so the one-way cloud sync is currently useless to me.  Even if it was not, over 10 days I exceeded the 1000 image limit.

There was one strange glitch when editing images: after selecting an image, going to full screen, and then back to tools view, a strange sort-of-floating-but-fixed tool panel appeared, with a single button (apparently a shutter butter simulation) and a little cog wheel, I assume for settings. I assume, again, that this has something to do with tethering, but neither button was responsive, and the panel could not be dismissed, and blocked part of the film strip. It could only be dismissed by restarting the app, and it soon reappeared soon after. Quite irritating but I got used to ignoring it. Capture one might consider hiring a test engineer…
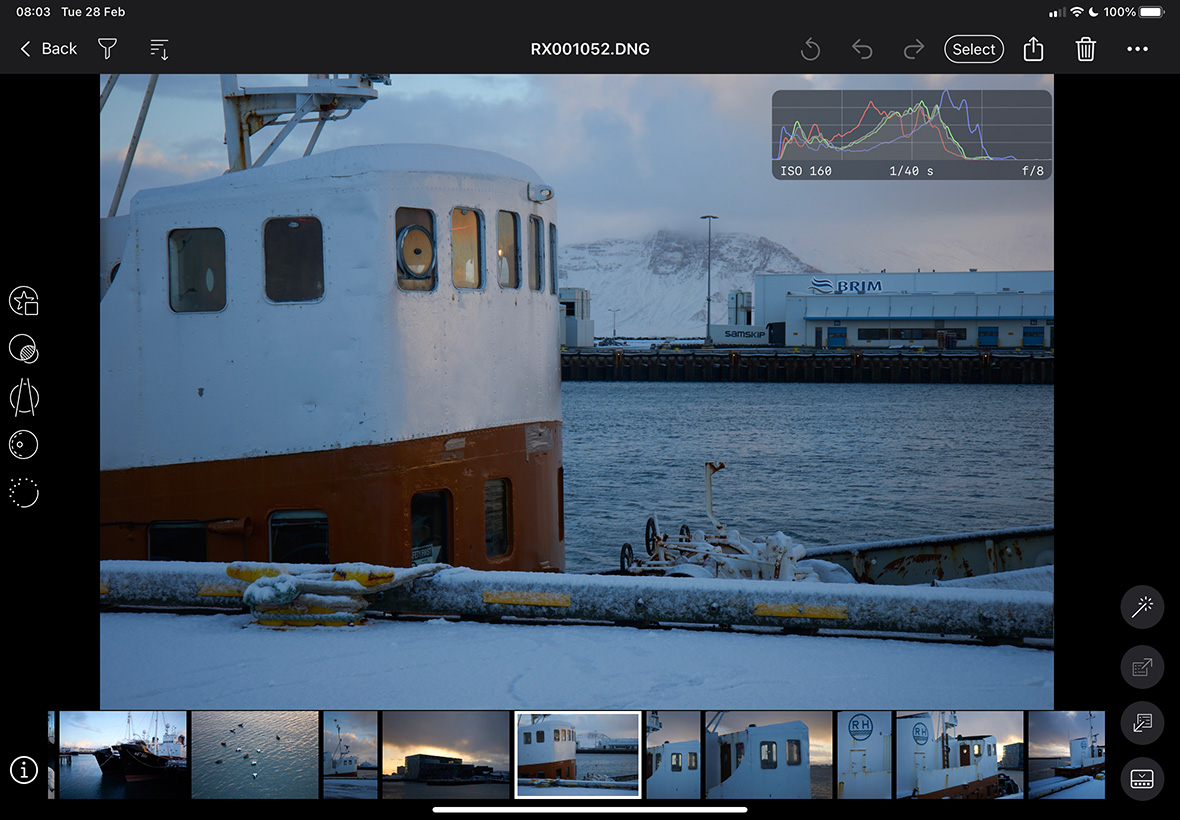
before appearance of the strange panel…
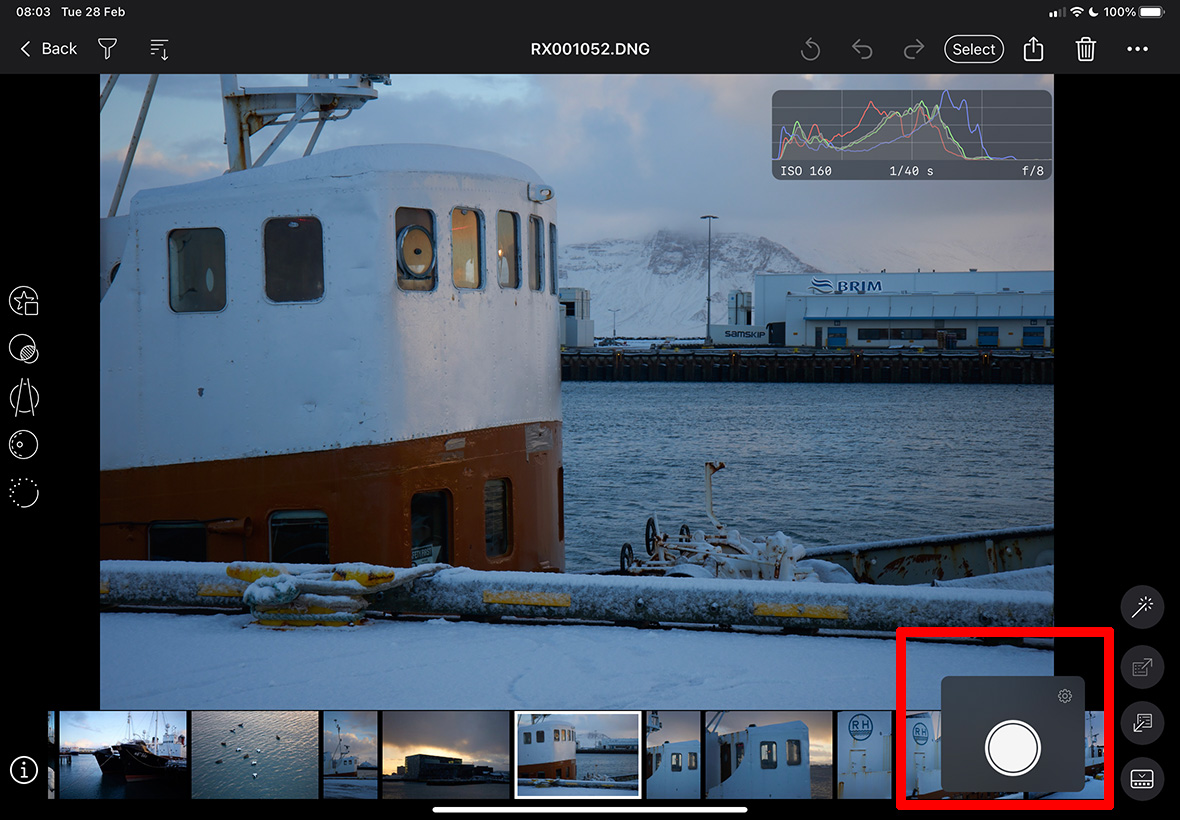
... and after appearance of the strange panel

Moving on to exporting, here it was again a case of “when it works, it works well”, but otherwise, very frustrating. The problem here is not in design, which is very intuitive, but in execution: I could never get more than 4 images to export at once. Sometimes only 3 worked. So before I realised this, I would select, say, 20, share to Apple Photos, and only 4 would turn up.  Not necessarily the first 4 in the selection, either.  There was no indication of any failure from Capture One. So I had to resort to 4 at a time, and since the initial preparation for export is quite lengthy, this was again time consuming and frustrating. Is this an iOS issue or Capture One, or a combination of both? I don’t know and frankly I don’t care. It should just work, and if there is a failure, I should be informed.

Finally, image backup. This works just fine. Possibly going via the Share function is not 100% intuitive, but having done that, I select “originals” as filetype, Files as destination, navigate to the external SSD, and execute. In this case there is no issue with the number of files, unlike sharing to Photos.

Overall, and despite the glitches, Capture One for iPad is a pleasure to use. Personally I really like the UI. I guess in order to fit in well with general iPad / iOS design principles, the app feels a little more modal than the desktop version, so there is a more explicit switch between “catalog mode” and “edit mode”, but this is fine.

But as a travelling landscape / nature photographer, I get the feeling that my “user scenario” was not high up on the list of product management priorities. I’m not actually all that bothered about editing in the field (but if I was, Capture One for iPad currently would fall short). I can’t properly edit on the move on an iPad, or even on a laptop, for that matter. Editing for real happens in my home office controlled environment. What I would really like to be able to do in the field is keywording and metadata editing. Capture One doesn’t offer that at all, but it isn’t alone in completely neglecting that aspect.

I could also happily use Capture One for iPad at home, away from my desktop, for tasks like keywording and triage, but then I would need proper two-way sync and less restrictive sync limits.

Capture One for iPad worked ok for me in Iceland, and liberated me from having to cart a laptop around, but having returned home, I really have no further use for it for now. So it makes no sense to continue the subscription. The cost is not unreasonable for something I would use regularly, but if I have no use for it, it is a waste of money. And it all adds up. I do strongly believe that it should anyway be included in a subscription, if not bundled with a perpetual license.


Posted in Post-processing on Tuesday, February 28, 2023 at 11:01 AM • PermalinkComments ()

Negative Lab Pro

Auf Wiedersehen, Silverfast

in Film , Friday, October 16, 2020

This is a quick review of Negative Lab Pro, a piece of software I’ve been aware of for some time, but only just now got around to trying.

Upfront, the website claims “NEGATIVE LAB PRO brings impossibly good color negative conversions right into your Lightroom workflow”. And it does exactly this. And it’s a really big deal.

I’m a long term user of Silverfast, and have defended it more than once, despite its insistence on ignoring all conventions, and the total deafness of its developers and managers to any kind of feedback or dialog. Despite all this, it’s pretty good. But the workflow is stuck in the 1990s, even if some minor concessions to openness have been added. Sadly for Silverfast, I think that Negative Lab Pro (NLP) is a major nail in the coffin.

NLP provides conversions which are at least as good, provides a totally non-destructive workflow in Lightroom, enabling easy creation of multiple versions of the same source scan, all fully re-editable.  On top of this it taps into Lightroom’s Profile mechanism to enable devastatingly accurate emulations of the rendition of standard scanners such as Fuji Frontier and Noritsu.

Of course, negative conversion is a very subjective thing, but the respective look of basic Frontier and Noritsu output is quite objective.  Generally I do all my own scanning, but some time ago I did have some lab scans done, just to get a reference point. For for now I’ve just take a recent XPan shot as a test.

NLP test

The top version is Silverfast’s Kodak Portra 400 NegaFix profile at default settings.  The lower is NLP at default settings. Again, colour negative conversion is a very subjective thing, but frankly, the NLP version to me looks like what Portra 400 is supposed to look like. The greens are more natural (although the Silverfast version may just possibly be more accurate, the grass was very green), and the NLP sky is complete free of the cyan tinge given by Silverfast, the shadows are better balanced. Game over, basically.

Of course, Silverfast provides a wide range of tools to tune profiles, to make colour adjustments way beyond what Lightroom alone can do, but all of this is destructive, sits within a clunky application framework, requires multiple steps and multiple file generations, and is generally slow.  NLP also has a wide range of adjustment tools, which are easier to understand and much faster to apply, making far more fun to experiment.

I’m sold on NLP. Silverfast will now be restricted, in most cases, to Raw scanning. Of course, by generating a Raw scan, in theory I can still process it through Siverfast HDR, but it gets very fussy if any other application has so much looked at one its DNG files.

There is only one drawback (and it could be major in some cases): NLP cannot remove dust and scratches using the infrared channel.  But on balance I guess I can live with that.

Posted in Film on Friday, October 16, 2020 at 07:31 PM • PermalinkComments ()

Why I still miss Aperture

whine, fanboy, whine

in Apple Aperture , Friday, April 17, 2020

It seems weird to be writing about Apple Aperture in 2020, some 5 years since its nominal demise. It does still work on MacOS Mojave, although it seems to make the OS crash if it is left running for too long (several days). I still lament its passing, while acknowledging that the stable door has been open so long that this particular horse has not only bolted into the next hemisphere but has been rendered down for glue.

But there is one feature of Aperture which I still use, and which I’ve never seen before our since its murder by Time “Bean Counter” Cook, and that is the Light Table.

I realise that for the vast majority of camera owners, Light Table is at best puzzling, but more generally a target of scorn. It has little to do with demonstrating that cats photographed with THEIR Superpixelmuncher X100X ProX are better than those of the next DPReview forum rodent.  That’s because it is a feature for photographers, not camera owners. And it’s brilliant.

A Light Table can be added to a Project, and can be used to arrange, lay out and edit (in the true sense of the word) a set of photos contained in that project. And I’ll say it again, it’s brilliant. Under peer pressure to do something useful with my COVID-19 confinement, I’m embarking on a couple of long, long overdue publication projects. One of these is to create a book. The big challenges in book creation are the selection and ordering of photos in a way which is coherent and conducive to the aims of the project.  The other is layout. Aperture’s Light Table can pretty much solve the first, and can help to get started with the second.

IMG 6463

The view above shows Aperture displaying a Light Table, with the pool of photos shown below in a browser strip (when added to the Light Table they gain a red counter icon). On the right I have an iPad acting as a second screen - this shows the photo selected, either on the Light Table, or in the browser strip.  So, simultaneously I have a freeform selection and layout, a means to browse and select photos out of my initial edit, and a full screen view so I can check sharpness or whatever.  When I place or move photos on the Light Table, automatic alignment and placing guides appear, like in InDesign or something. I know of no other application which can do this. Whichever unsung hero came up with this concept, (s)he deserves a mega award.

And it doesn’t end there. You might say that the Light Table seems a little constrained. No problem, drag a photo or photos off of the area in any direction, and the light Table expands to accommodate them.  There may be a limit, but I’ve never encountered it. Of course, you can also have any number of Light Tables you want under a Project, so you could even dedicate one to each spread.  Then again, Aperture also had a superb Book tool, so really you’d just progress from a rough mockup using Light Table to Book.

And there’s more: using the sort-of gadgety (only it isn’t) Loupe, you can examine any part of any photo, at your chosen magnification, in-situ.  And, thanks to Aperture’s unparalleled integration, using the HUD panels, you can pretty much do anything to any photo, also in situ, be it add keywords, check metadata, or even fully edit (in the Photoshop sense) the photo (of course all this worked in Books too).

ApertureLoupe

The much-maligned but actually very slick Loupe

ApertureHUD

The Light Table with adjustment tools HUD

Ok, it took a few versions for Aperture to fully deliver on its lofty ambitions, but once its got there (let’s say v2.5) it was humming.  Everything fit together like a well engineered Swiss watch. Unfortunately, the Apple dumbing-down disease struck a glancing blow to v3, but it was only superficial.

So given all this, why did it ultimately fail? Well, setting aside the fact that such an application just did not fit into Apple’s consumer disposables vision, and indeed probably only ever got approval because of Steve Job’s antipathy towards Adobe, it did suffer in detailed comparison in some areas to the far less ambitious Adobe Lightroom. For example, the pixel peepers and forum rodents could point at minute and adjustable differences in initial rendering - usually of noise at 1’986’543’200 ISO, or sharpness of Your Cat’s whisker at 500% magnification. Also Apple was pretty sluggish at keeping up to date with new camera releases, which Adobe correctly saw as an absolute priority.

What sunk Aperture was essentially Apple corporate culture.  It was overcome by a brilliantly conceived and ruthlessly executed social marketing campaign by Adobe, playing on all of Apple’s corporate weaknesses (obsession with secrecy, no interaction with customers, etc).  Aperture was different to Lightroom, and in many ways.  But Adobe managed to ensure that the competition was judged by one facet only, the pixel-peeping level characteristics of its image adjustment toolset. And actually even here Aperture had some unique and very powerful features (the implementation of the curve tool, for example), but nothing was going to save it against the massed ranks of photo-influencers like Jeff Schewe, Scott Kelby, Michael Reichmann and legions of others.  Apple just could not bring themselves to put the spotlight on others. Or, of course, horror of horrors, release a Windows version. No, people had to buy Macs to use Aperture.

Had Aperture been developed by an independent company, free of the clutches of Jobs, Cook, et al, I’m pretty confident it would have flourished. It was aimed at a market segment which is still not served today - it’s a pity the marketers never realised that.

I’m still happily using the Light Table, and it integrates pretty well with a Lightroom-centered workflow. But I’m on the last version of MacOS where this is possible.

Posted in Apple Aperture on Friday, April 17, 2020 at 05:00 PM • PermalinkComments ()

Software

displacement activity I

in Post-processing , Tuesday, December 11, 2018

I’ve recently been going through some kind of phase where I’m reassessing a lot of my work. Initially this was on an aesthetic level, but somewhat inevitably technical considerations started to intervene. First of all, I have been trying to get a little more disciplined in my picture making. Although I like to think that I’m pretty much on top of the basics of using a camera, I have tended to be a little indisciplined in how I apply this knowledge. This then leads to, for example, photos with too much, or too little depth of field, because I was too lazy to think about optimising aperture. It all came about when I started to make prints of some of the recent series of woodland photos I’ve been making. In turn this led me to making a number of “test” prints (to be perfectly honest, I probably don’t make any other kind). And so I noticed that the colour in these prints was actually a bit weird, and so _then_ I just had to re-profile the paper, which more or less fixed the issue, but used up all my supplies. And left me wondering how my previous carefully created profile had “gone bad”. And off we go again.

Untangle II

“Untangle I” - the photo that led me to re-evaluate my printing

Or not - prompted by an article I saw recently, I wondered if maybe it might be a good idea to revisit ImagePrint by Colorbyte Software. I used to use ImagePrint with my Epson 2100 printer, but when this died, and some 8 years ago I splurged on an A2 Epson 3800, I would have had to upgrade my ImagePrint license, and I couldn’t afford it. So I bought a Pantone ColorMunki Photo kit instead, which allowed me to profile any printer paper I wanted. Of course this was not the only option: many paper manufacturer profiles are actually more than close enough, and if they’re not, various service providers can create custom profiles for a given paper and specific printer. But of course I wanted to do it all my own way, and now I think about it, I’ve gone through at least 3 printer profiling setups over the last 15 years or so, none cheap.  And in fact even with dedicated software and hardware, colour science, which this is an application of, is seriously hard and time consuming, apart from being a money drain.

ImagePrint on the other hand does absolutely everything for you. It includes a custom print driver which brings a number of tangible benefits, from more accurate colour to saving paper, and a huge library of expert print colour profiles tuned not only to printer/paper combinations, but also to different lighting conditions. The basic point of ImagePrint is that it offers 100% reliable, plug & play highest quality printing. So you can just forget about all the technical complexities and just enjoy the creative part. This to me is quite enough to justify the fairly high price, but on top of that there are myriad additional features which offer significant advantages in various printing scenarios.  So I renewed my license for the latest version, “ImagePrint Black”, and ever since I’ve been printing a lot more, with no test prints required.

That solved my output problems. Next up was the input. I had been working on a set of photos recently for my 2018 calendar, and revisiting these I noticed that one of them was not quite right. This was a photo of an iceberg, which look fairly spectacular, but after I printed it (see above) I realised it was all a bit too, well, blue. So once again a trip down the rabbit hole of Raw conversion software beckoned. I decided to download a trial of the latest version of Capture One, v11 (now they’re on v12), and opened a few iceberg photos. One of them, not the one that had initially sent me into a spin, really shocked me: Capture One appeared to be showing textures completely missing in the Lightroom interpretation, and better fine detail as well. I cross-checked in Exposure X3, and in Iridient Developer, and the variation across these gave me the clue I needed to narrow the gap - it was simply a case of reducing the exposure, which in Lightroom seems to have a complex relationship with brightness. The much more involved Capture One default processing had, in this case, given better results.  As for the fine detail, well, there, at least with Olympus ORF files, the current iteration of Lightroom cannot match Capture One, or indeed the new Exposure X4. Both extract more real detail, although frankly only us pixel peepers would notice in almost all cases. But this comes with a price with Capture One, as any kind of noise reduction coupled with sharpening gives a horrible plasticky effect in recent ORF files. This is nothing new - I noticed it with v8 and it was just that made me decide to give up fighting and submit to Lightroom for once and for all.

Drm 20161203 PC030310 IridientEdit 3

“float” - the photo that used to be far too blue

However, Capture One has another major card up its sleeve, at least for me: the luminance curve. In Lightroom pretty much any change to contrast, by direct slider or by curve, has a major effect on saturation as well. Apparently this is by design, and it is stubbornly maintained, but personally I hate it. You can compensate by reducing saturation and/or vibrance, but first, this is imprecise, and second, why the hell should one need to? This naturally led me to the realisation that I should just be more disciplined with applying a previous strategy: do the Raw conversion in Iridient Developer, which is far less heavy handed, has not only a luminance curve, but also a chroma curve, and delivers the best detail and sharpness of all, then do the rest in Lightroom. Iridient even includes a Lightroom plug-in to facilitate all of this.

So, after this bit of re-evaluation, I have ended up with a software end to end process (I’m not going to call it a “workflow”, this is fun, not work) which drags the absolute best of my pitiful 16 Mpix sensor camera, and starts to approach the delicacy I’m always aiming for in colour and colour transitions.  Having got those variables out of the way, I can now concentrate on choosing the correct f-stop.

Posted in Post-processing on Tuesday, December 11, 2018 at 09:20 PM • PermalinkComments (1)

RIP Media Pro (1995-2018)

phased out

in General Rants , Wednesday, September 05, 2018

Last week I received a very unwelcome email from Phase One, current owners of the venerable MediaPro DAM application, announcing their decision to discontinue the product.

Mediaprose

This isn’t really a big surprise, but it reflects very badly on Phase One as a company. They took over MediaPro from Microsoft in May 2010. I suppose their idea was to bolt it on the Capture One in some way, so as to have a more complete competitor to Lightroom and Aperture. In the event, some Media Pro concepts and design concepts have made their way in Capture One, but they didn’t need to buy the product for that. I doubt that they recruited any developers along with the acquisition, as the original team was hired by Microsoft when they took it over in 2006, and since almost no further development was done, probably that team dispersed.

It is a massive compliment to the original developers that MediaPro could still be a valid tool, and indeed in many ways a benchmark, after about 15 years of almost total neglect. It had a few pointless corporate make-overs, and the catalogue size limit was raised, but apart from that, zilch, apart from the (usually late) integration of the Capture One rendering engine.  Indeed, on the Mac some menu items are unchanged since pre OS-X days. And yet it is still elegant and very effective.

The problem appears to be that, unsurprisingly, the codebase is now completely obsolete, and will soon stop working at least on new macOS releases.  But this is nothing new: if Phase One had done a little due diligence back in 2o10 they would already have known this. The best case scenario is that they failed to do so, and hence were incompetent. The alternative is that they knew damn well it was heading for a cliff, did nothing, and milked whatever remaining customer base there was for all they could until finally they could pretend no longer.  The last full release, the grandly named Media Pro Second Edition, brought precisely nothing to the table, apart from a standard Phase One inflated price tag.

Their proposal now is that users switch to Capture One, which as a DAM, has far less functionality, and is frankly a joke compared to MediaPro for cataloging.  They are not even offering a discounted, or (gasp) free CaptureOne license as an apology. They are basically saying “thanks for your money, now fuck off”, or some Danish variant thereof.

Well, frankly, that seems to be par for the course for PhaseOne. I will certainly not be a customer of theirs any longer.  Their hardware is obviously out of my league, and their CaptureOne software is actually nothing special, and is ridiculously overpriced. Sadly a lot of people fall for the garish, overblown default look that CaptureOne applies to Raw files, and then get sucked in to its clumsy gasworks of a user interface and terrible catalog performance. Yes, it can all be dialled down, but side by side I’ve never seen anything that Capture One can do that Lightroom cannot do equally well or better.

But in any case, their behaviour with MediaPro shows just how much contempt they have for their non-megabucks spending customers.

I will be migrating to PhotoSupreme from MediaPro.  In many ways it is not as elegant, but it has a lot more functionality, and as far as I can see, the best alternative on macOS.


Iview2000

The iView website, back in 2000. Interesting that it was already available in Danish…

Posted in General Rants on Wednesday, September 05, 2018 at 01:02 PM • PermalinkComments (7)

Page 1 of 5 pages  1 2 3 >  Last ›